Welcome to another blog about A2X! We will be showing you how to connect A2X to Amazon.
Just as the previous blog on “Connecting A2X to QuickBooks Online“, we start off this step-by-step process assuming that you have already set up a shell company in A2X.

In this article, you’ll learn:
- Why Use A2X?
- Connecting A2X to Amazon
- Connecting A2X to Amazon when you’re not an Amazon admin
- Settlement Format
- RECAP: Connecting A2X with Amazon
Let’s get into it.
Key Takeways
- Purpose of A2X
- Connecting A2X to Amazon
- Benefits of Using A2X
Why Use A2X?
A2X helps automate your Amazon accounting. It pulls in your settlement data from Amazon and creates summaries of accounts, invoices, and/or journal entries; working together with QuickBooks Online to make that data more useful to you. Getting your accounting right as an Amazon seller can really take your business to new heights.
For more information on A2X click here.
Connecting A2X to Amazon
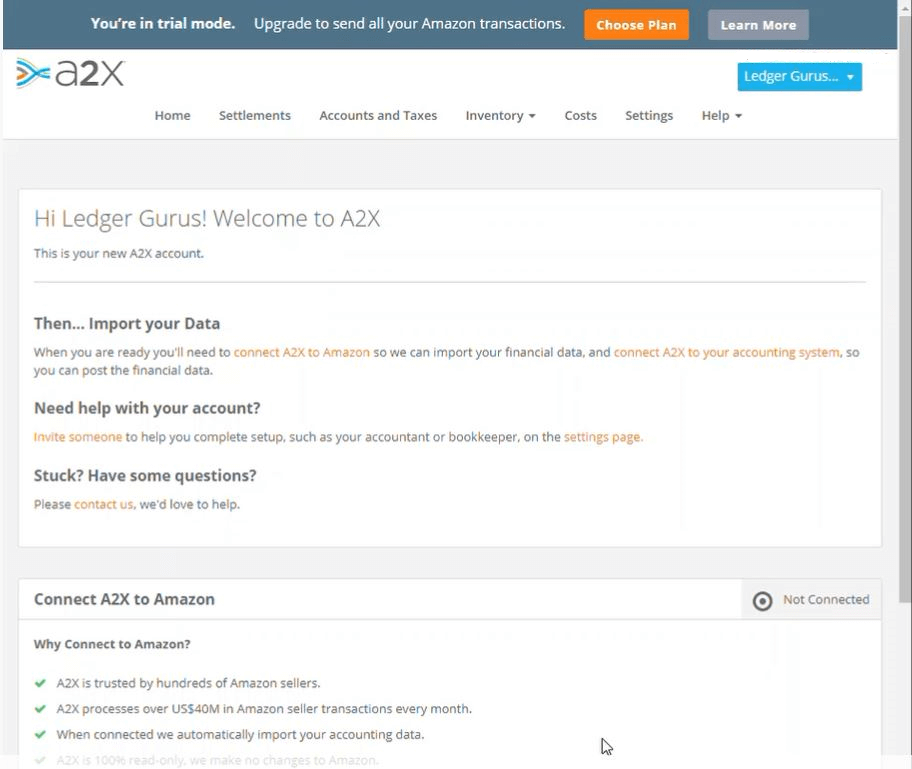
STEP 1: Go to A2X homepage
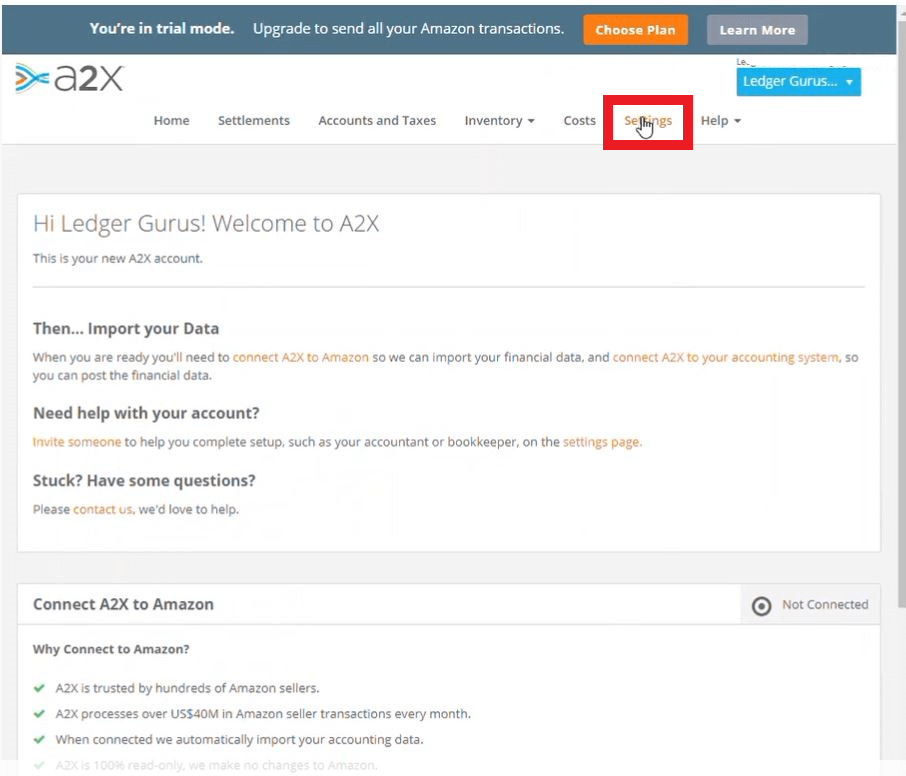
As of yet, you haven’t connected Amazon to A2X, so we first visit the homepage for A2X.
STEP 2: Two ways to start the process
There are two ways to initiate the connection process.
Option 1 – Connect directly through the A2x Homepage (all your connected systems should be listed)
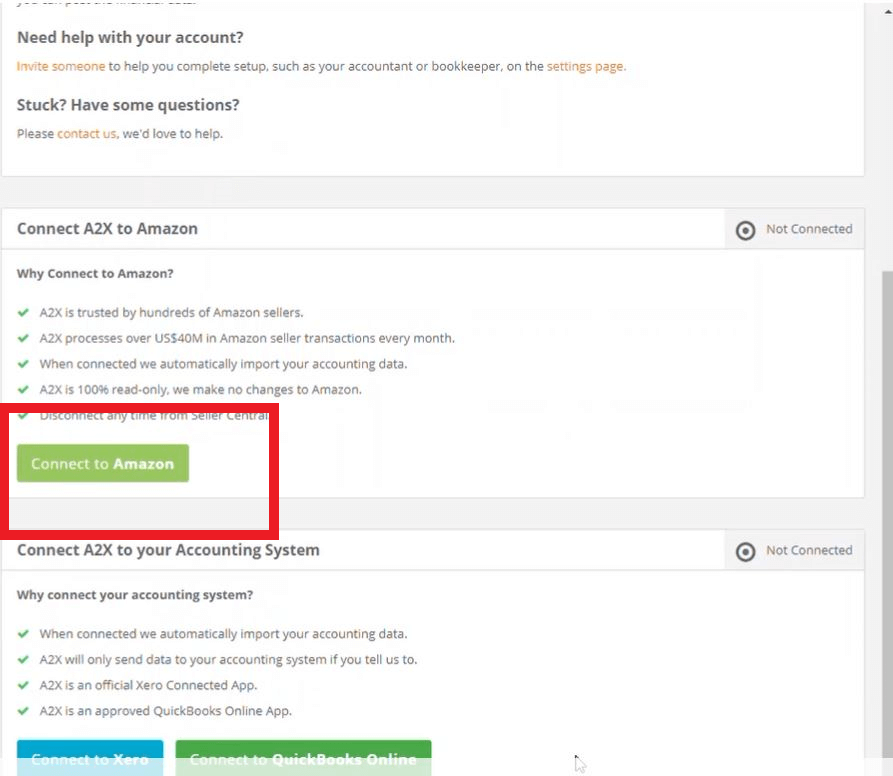 Option 2 – Connect through settings
Click “Settings”
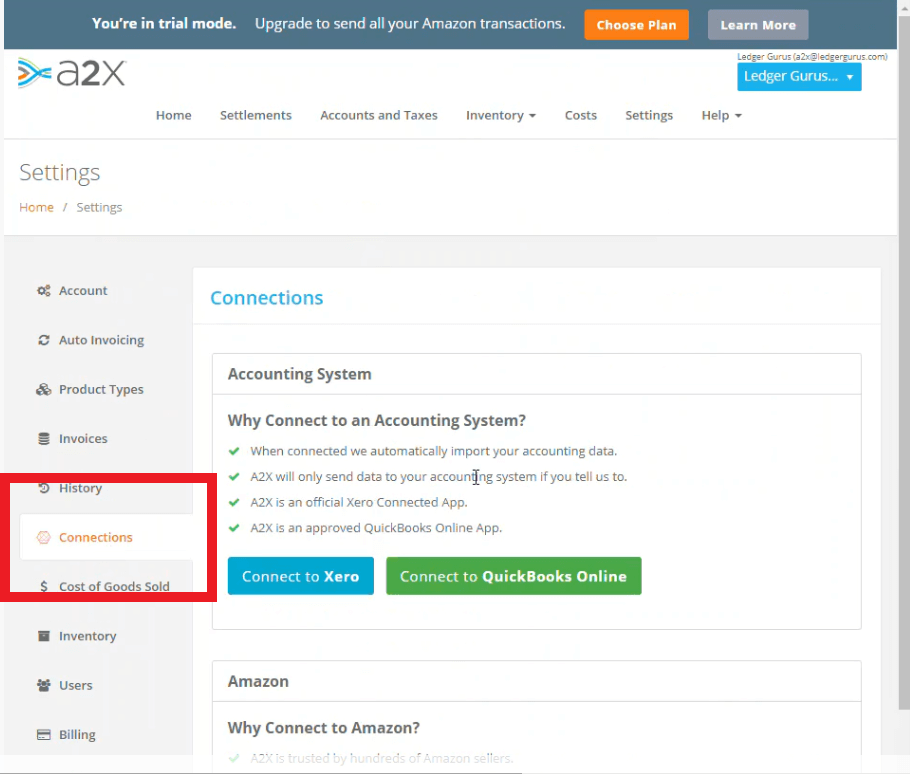
then click “Connections”
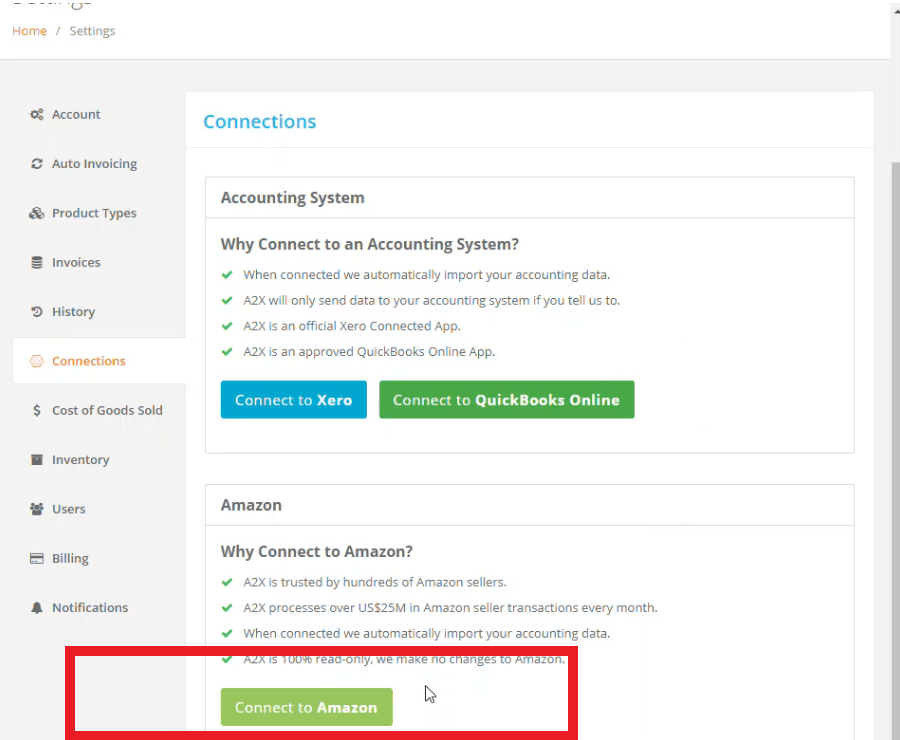
 next click “Connect to Amazon”
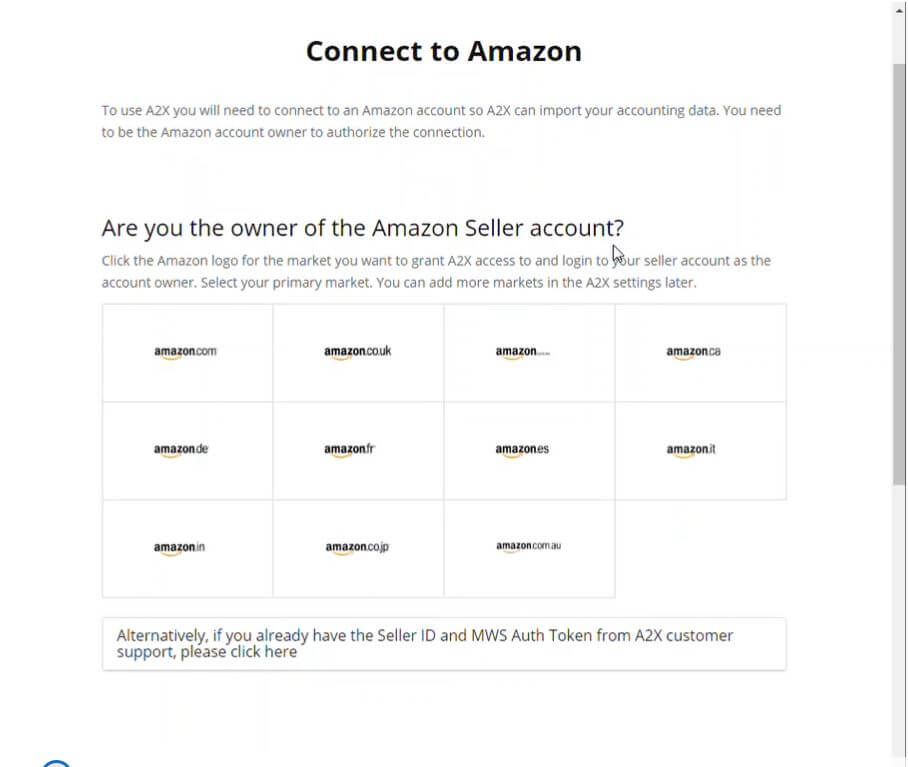
If you are the Amazon seller admin, then this is the right section for you. You will click on the Amazon Logo for the primary market you want to grant A2X access to. We are going to use Amazon.com for our example, but you can add other markets in addition to this one later. Finally, you will login into your seller account as the account owner.
Connecting A2X to Amazon When You’re Not an Amazon Admin
As a seller, you have to be the one to login to your Amazon account in order to connect it to A2X. If an accountant has setup your A2X account and not yet granted you access to A2X, they will need your help in connecting Amazon. It is a good idea not to share your Amazon login info with third parties such as an accountant, accounting firm, etc. (Here at LedgerGurus don’t have a seller/client give us login info for QuickBooks or Amazon. We usually request an accountant version/login. The accountant version/login works for connecting QuickBooks to A2X, but can’t be used to connect Amazon to A2X.)
So, if you (1) have admin login credentials for your Amazon account and (2) have setup and have access to your own A2X, you should be able to easily connect A2X to Amazon. You can now skip to the “Settlement Format” section of this blog to finish setting up your Amazon account with A2X.
If you need to connect your Amazon account with an A2X account that your accountant has setup, your accountant has two options:
- Granting you A2X access as a “User”
- Sending you an email invite to connect Amazon
Granting A2X access by making the party a “User”
You accountant will follow these steps:
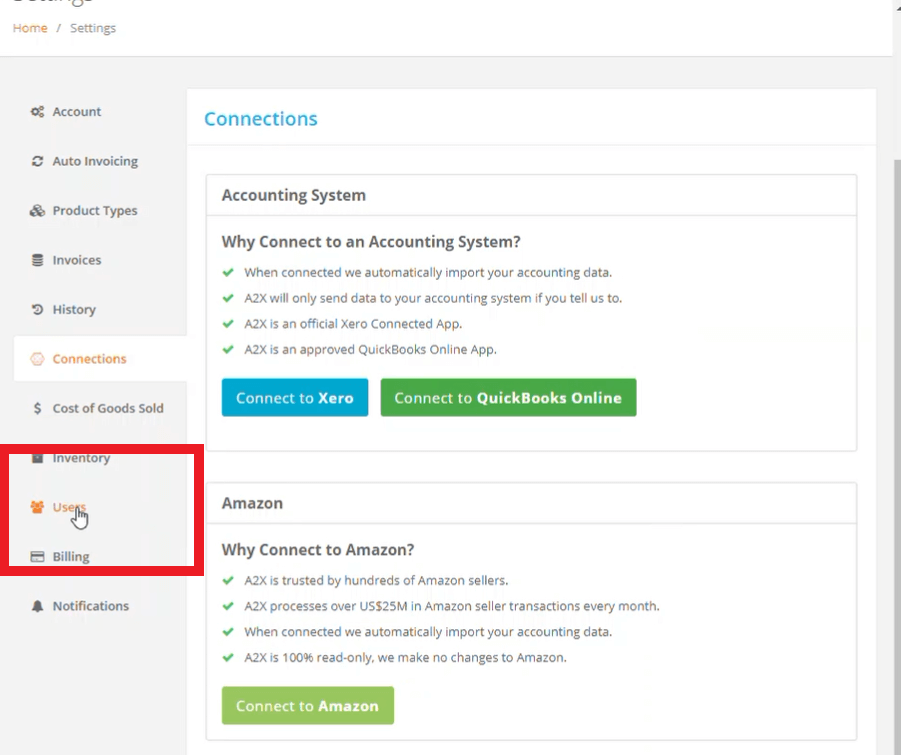
Click on “Users”
Type in the email address of the user that needs to be invited (the Amazon admin); so let’s say “Barneyisadinosaur@purple.com” is the user we want to add. Click on “Invite User“,
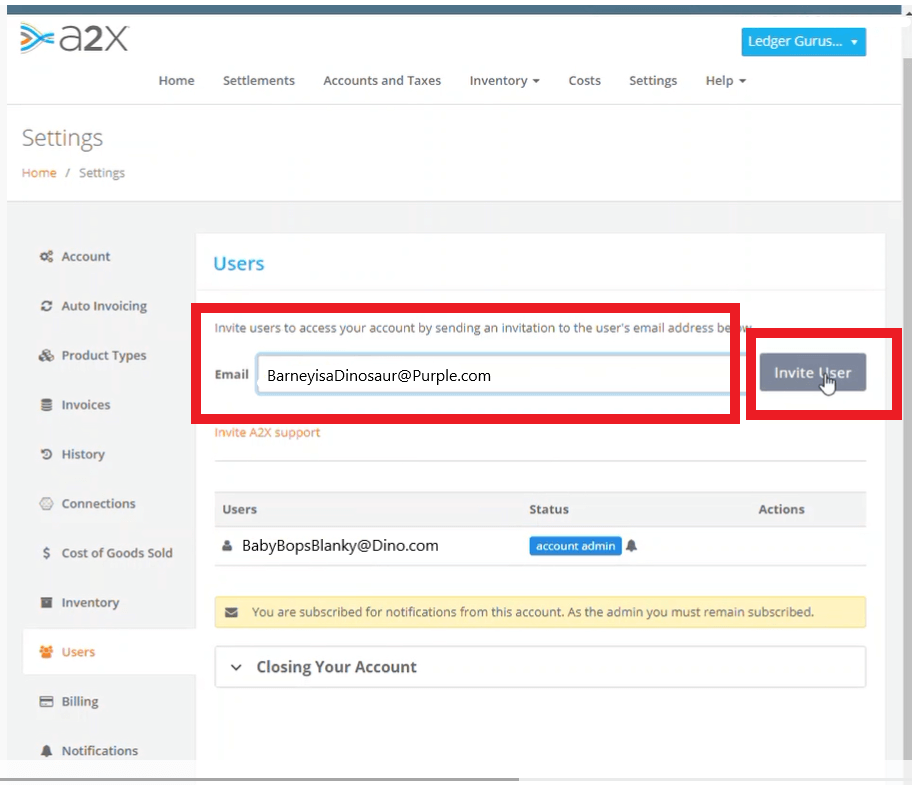
Once this user goes in and accepts the invite, this won’t say “pending invite” anymore, it will show them as a normal user.
HeThe user would then be able to connect Amazon to A2X using the steps already mentioned in this blog.
Connect A2X to Amazon with an email invite
Another option your accountant has is to invite you to connect Amazon to A2X via email. Below are the instructions.
Click on “Connect to Amazon”

A screen will pop up asking “Are you the owner of the Amazon Seller (central) account?”
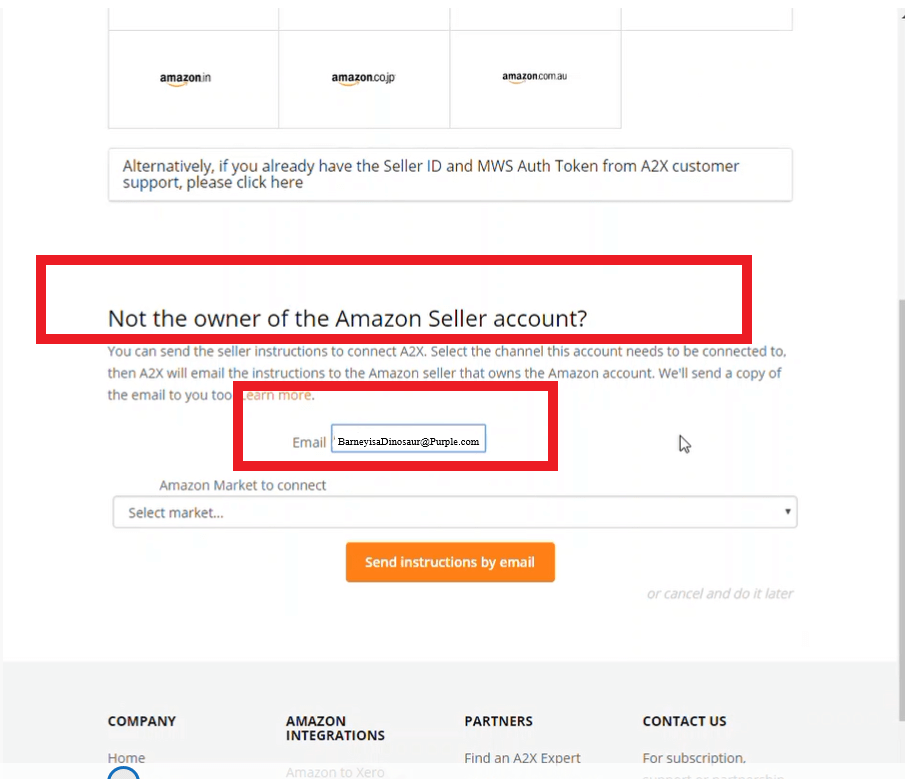
If you are not the Owner then you would scroll down to this section that says “Not the owner of the Amazon Seller account?” And enter the email for the company/individual that needs to connect their Amazon account.
Then click on the “Select Market” drop-down menu to choose the market you want to connect to. For this example we will select “Amazon.com”
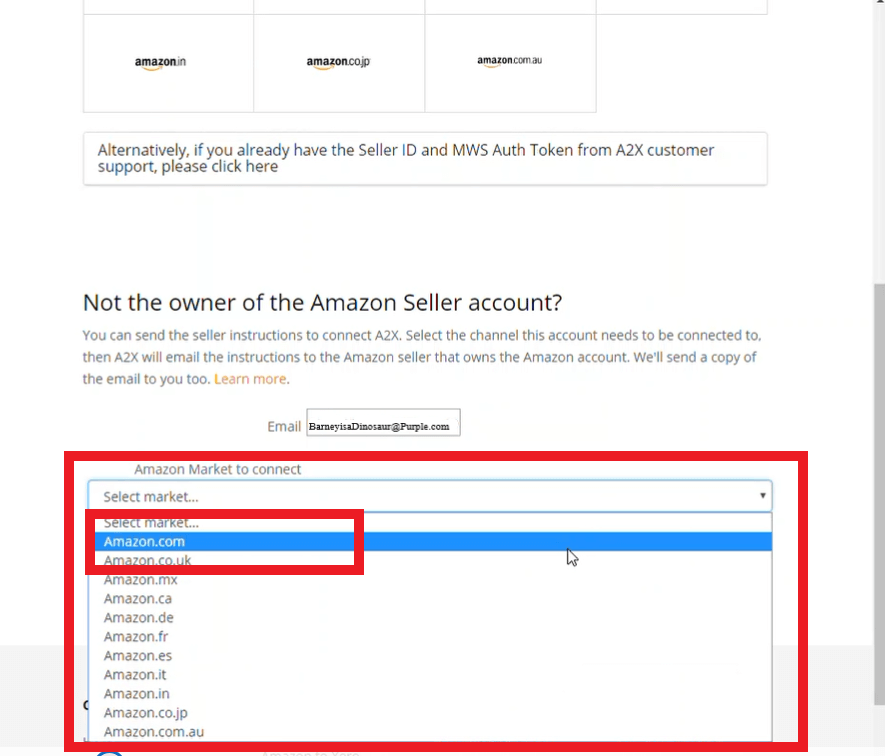
Once you have selected your Amazon Market, click on “Send instructions by email”
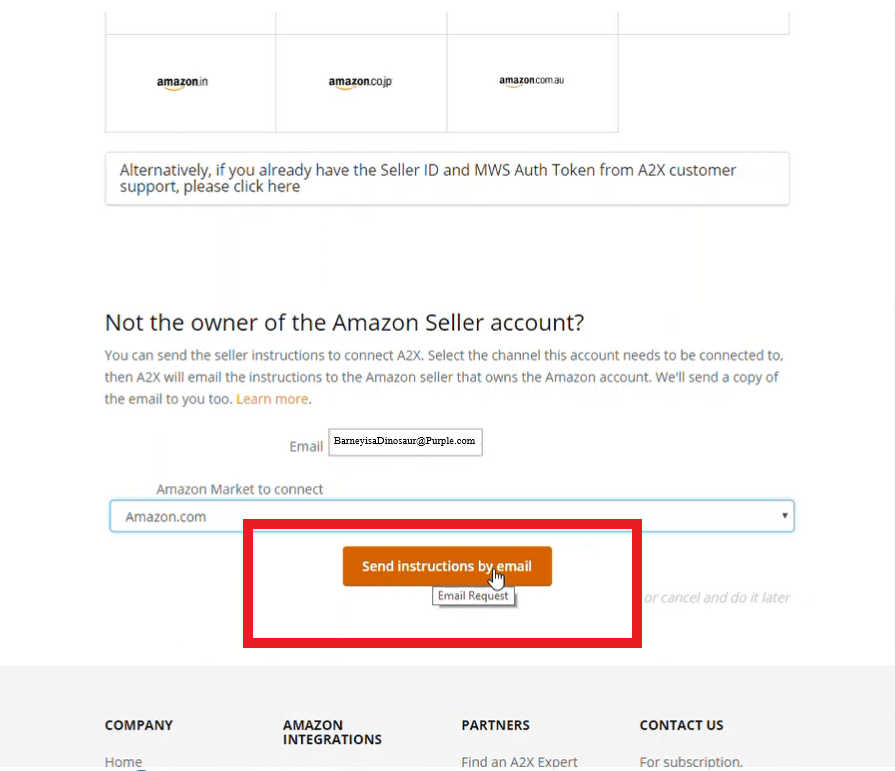
Then they would open up their email and connect A2X to Amazon with their admin seller-central admin credentials without even having to become a user on A2X. The accountant wouldn’t have to go through the process to set them up as a user.
The email the Amazon admin is going to receive will look like this:
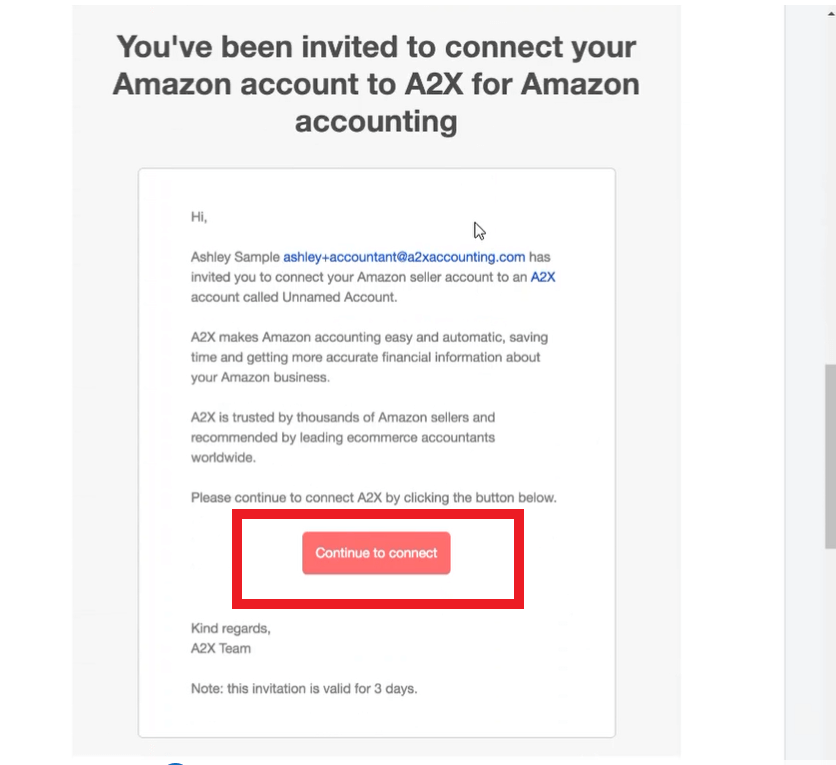
Click “Continue to Connect“.
The Amazon admin would the follow the steps outlined, starting off by clicking “Connect to Amazon” and logging in to Amazon.
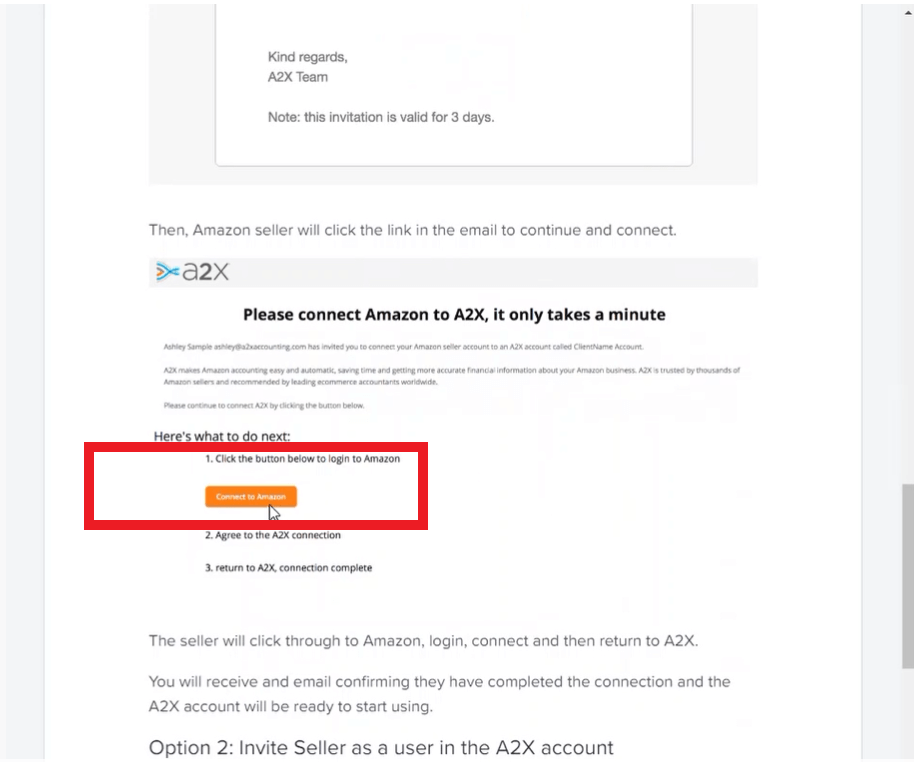
And then continue through as prompted (clicking on “Connect to Amazon” buttons a few more times).
Once the company/individual has finished connecting Amazon to A2X, the A2X user who sent the invite should receive an email that confirms the completion of the connection.
Settlement Format
It is crucial that Amazon settlements on Amazon Seller Central are in Flat-File V2 format, otherwise, A2X cannot pull them in.
The following example outlines why settlement format matters.
First we begin by accessing an Amazon sellers central account,
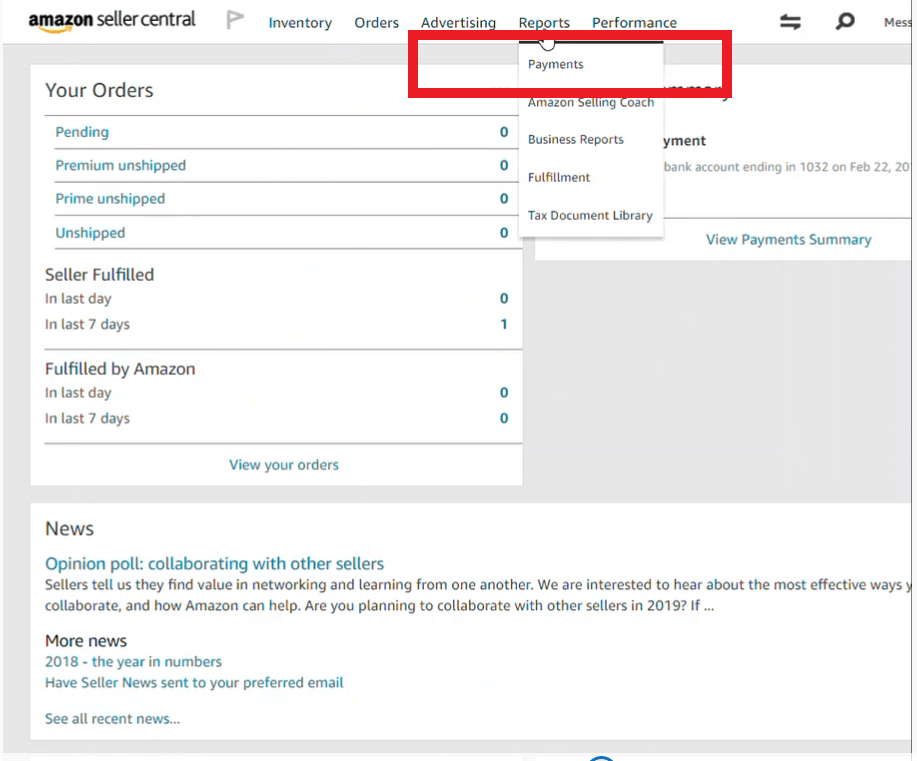
Go to “Reports“.
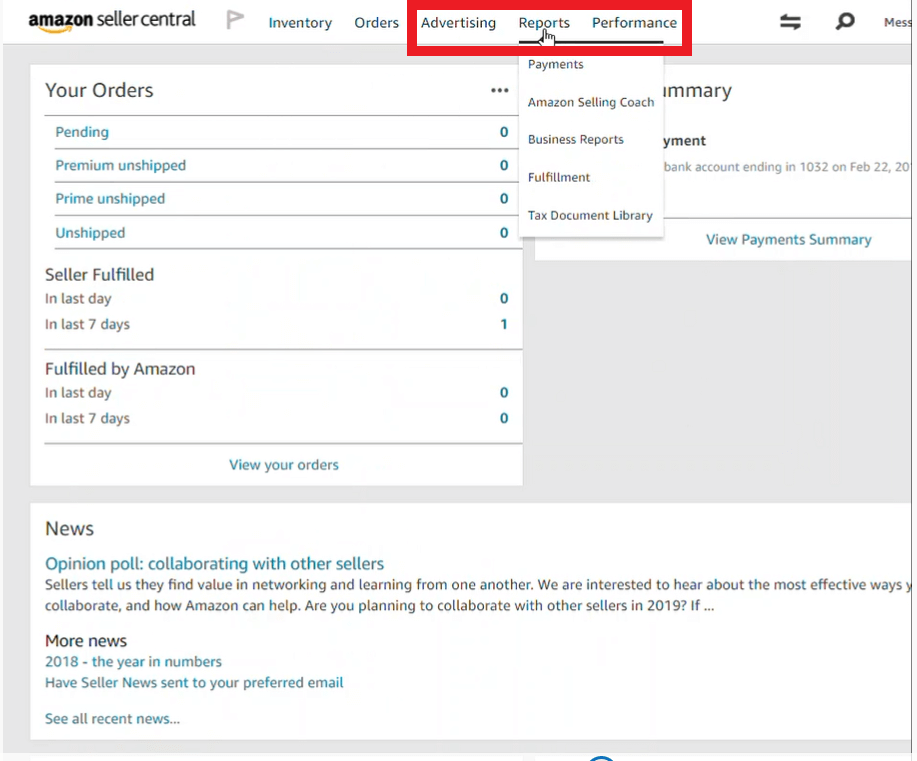
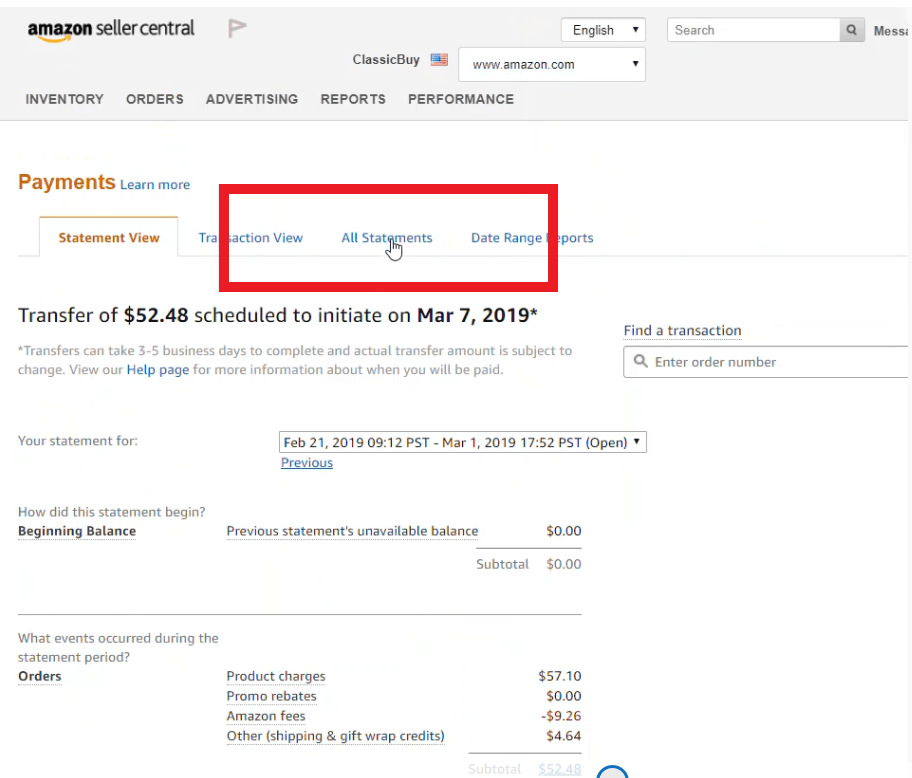
Then click on “Payments“.
Then click “All Statements“.
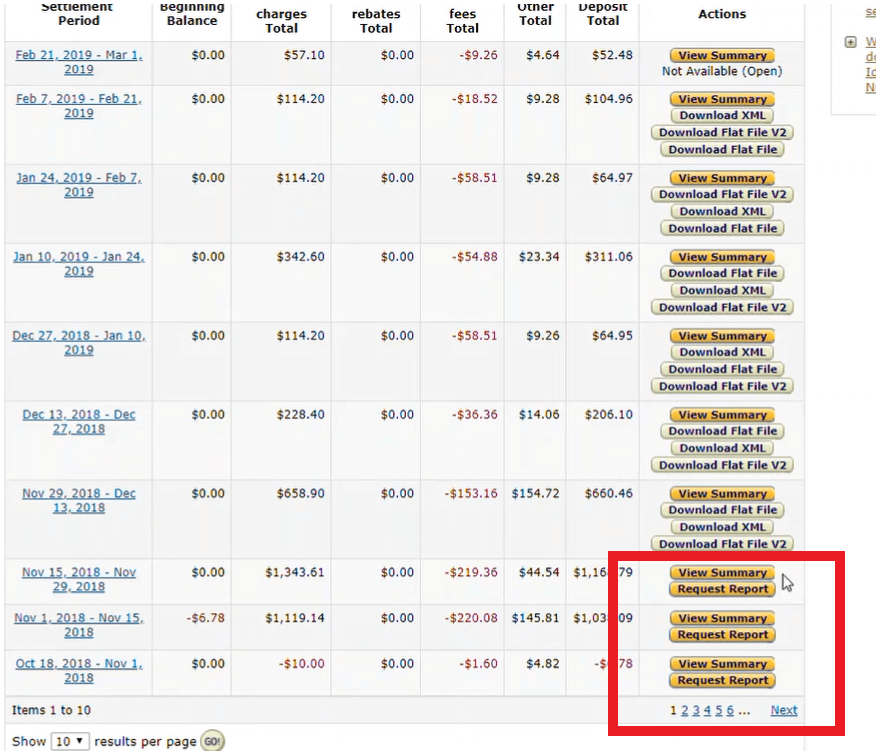
Scroll down to the “Actions” column.
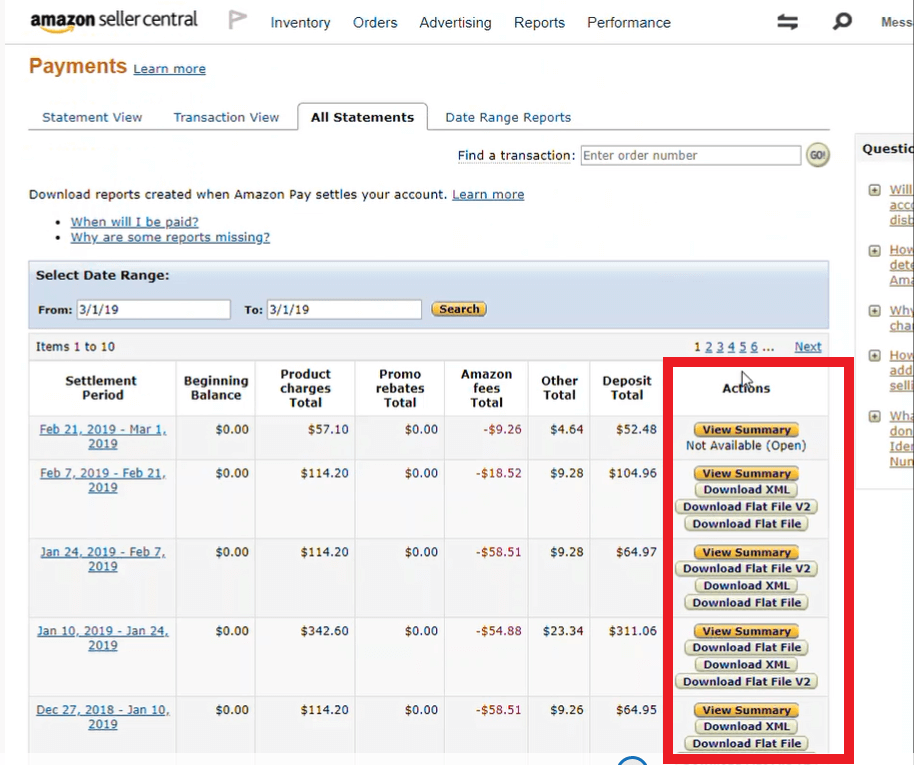 These reports are in the correct Flat File V2 format, so they can be pulled over from Amazon to A2X.
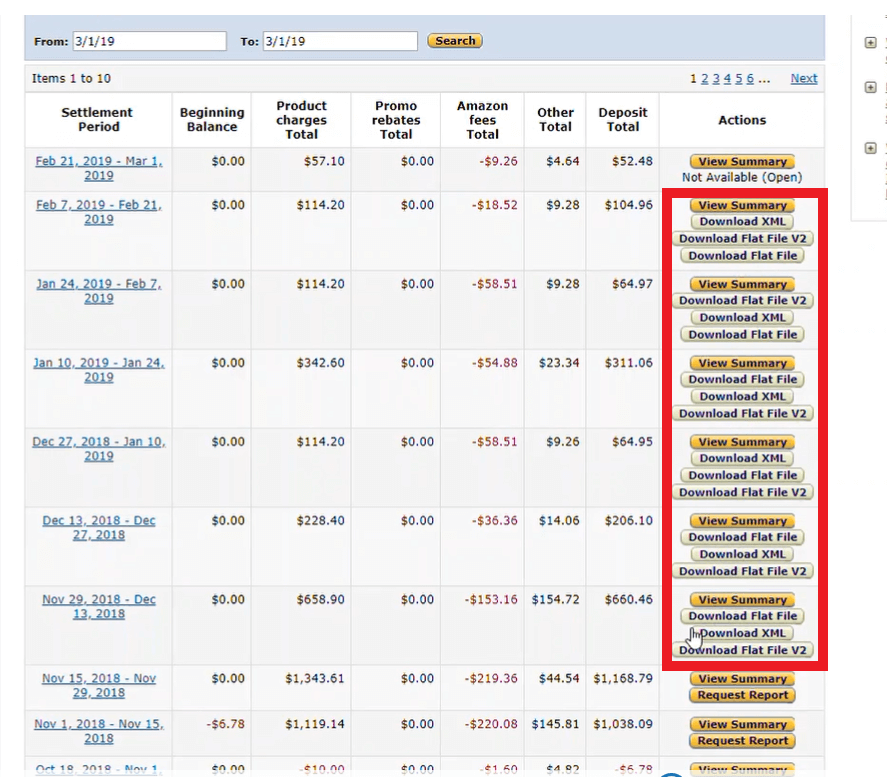
The settlements at the bottom of the “Actions” column are not in the correct Flat File V2 format, so they cannot be pulled over to A2X.
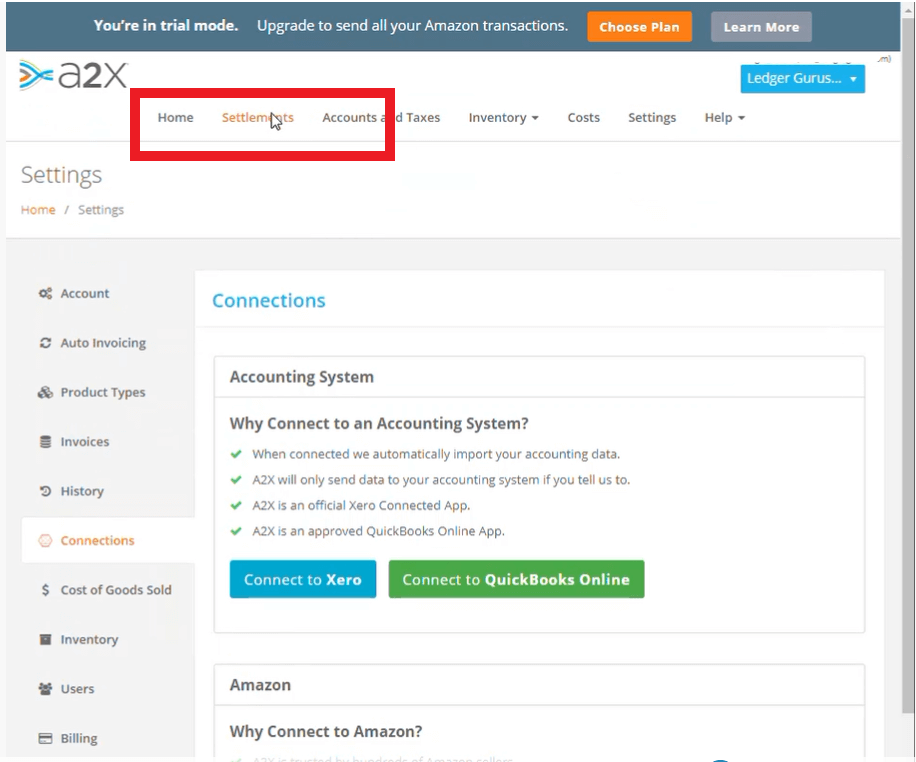
To view your settlements in A2X click “Settlements” at the top of the page.
 If there are no settlements listed, but you know that there should be, this is a clear sign that they were not uploaded in the correct Flat File V2 format.
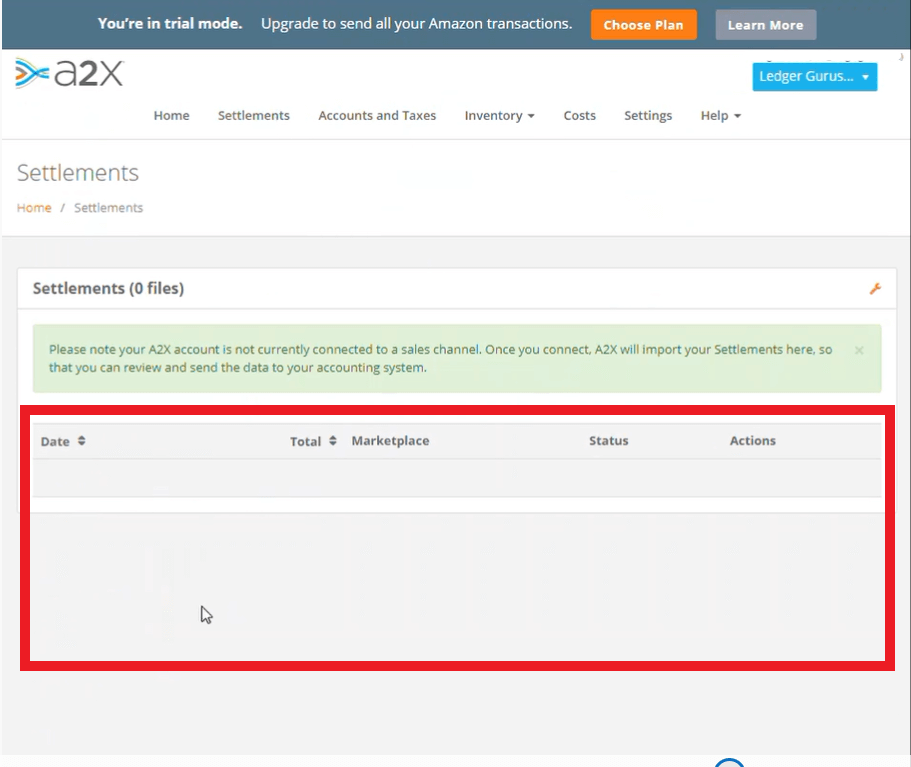
Or maybe you can see one or two settlements listed, but it seems some are missing and it’s in a certain date range.
We can investigate and correct the situation. Let’s look at an example by clicking on “LedgerGurus” in this case (Your Company).
Then using the drop-down menu choose the corresponding account for the missing settlements. In our example we will click on “BJs Hat“.
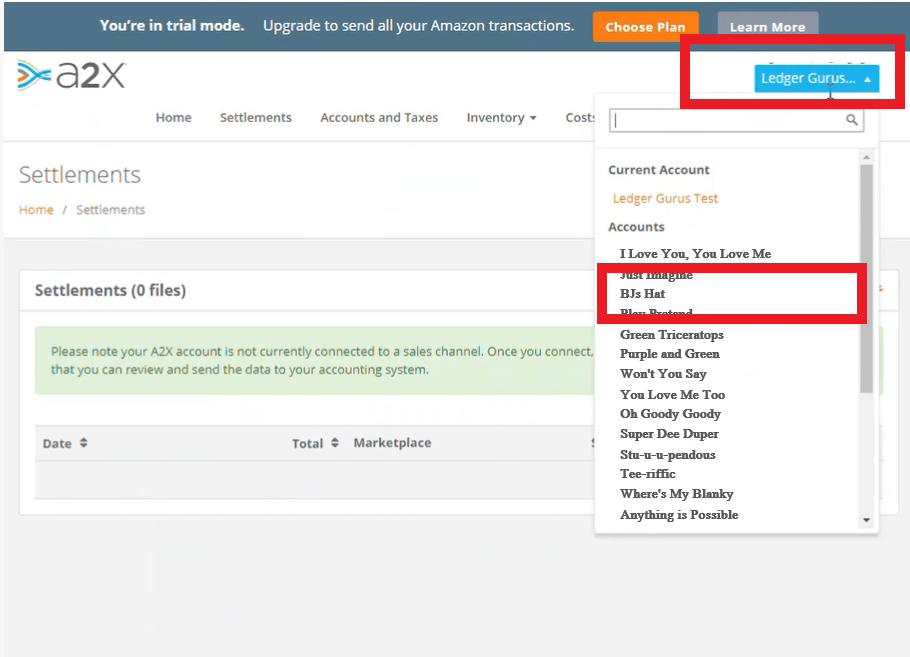
The following screen will appear
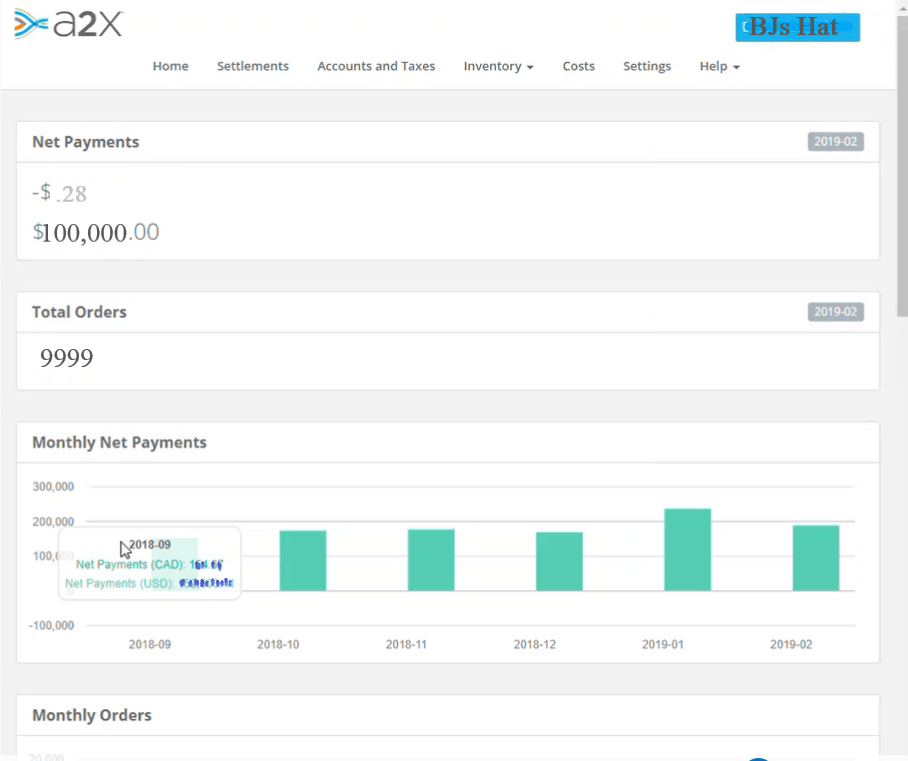
Scroll Down to Settlements
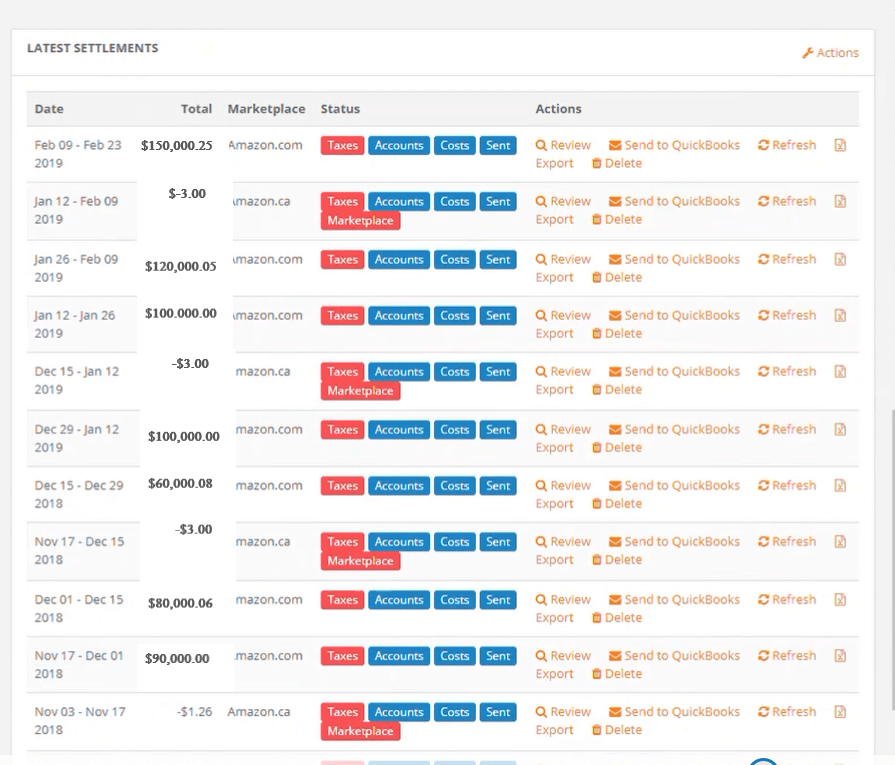
If there are settlements listed there that are not showing up in A2X then the first place I would go is to Amazon Seller Central. Because most likely what has happened is that these reports are not in Flat File V2 format.
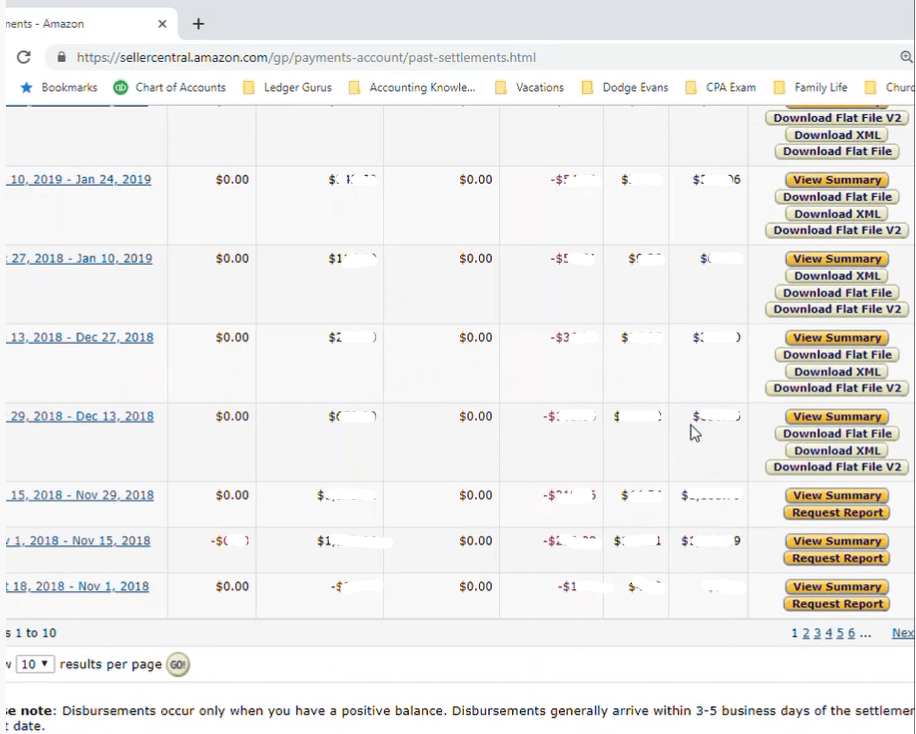
So I would once again start off in sellers central.
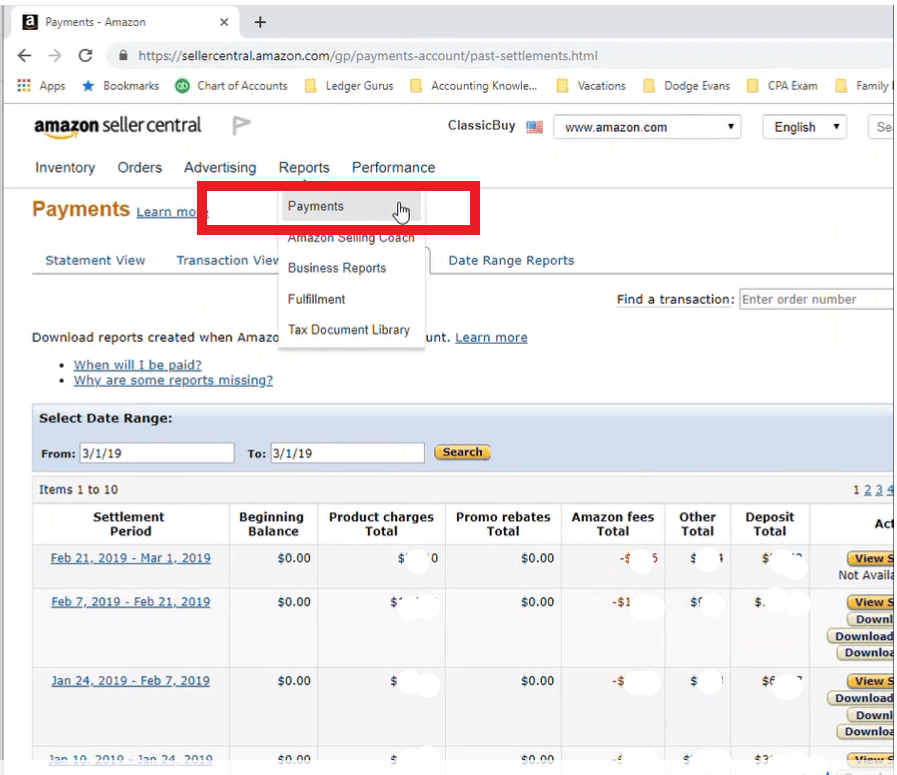
Click on “Reports“.
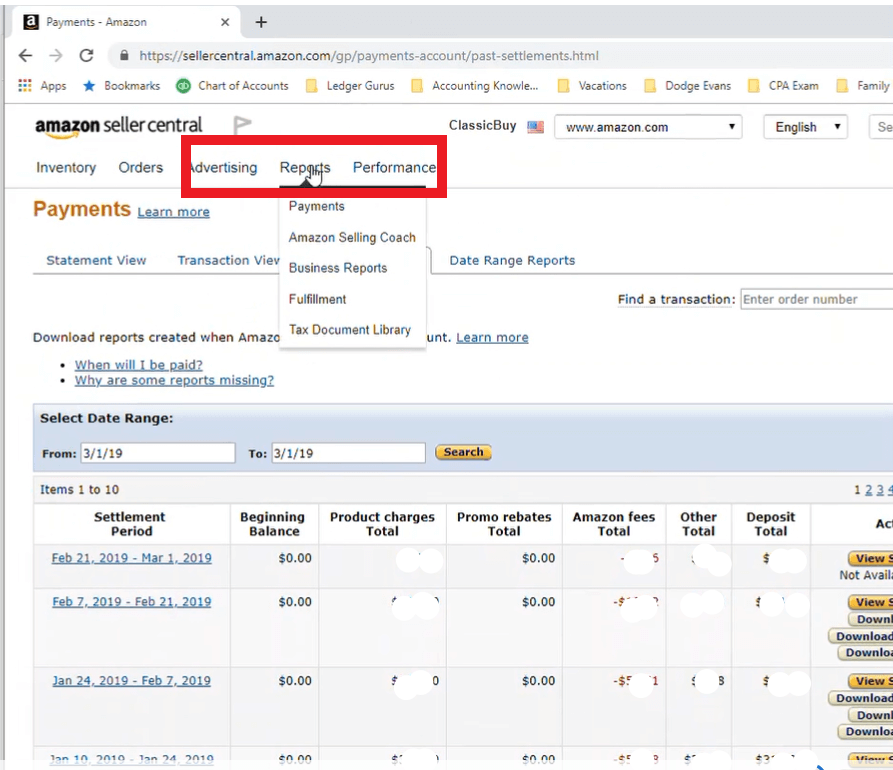 Then select “Payments” from the drop-down menu.
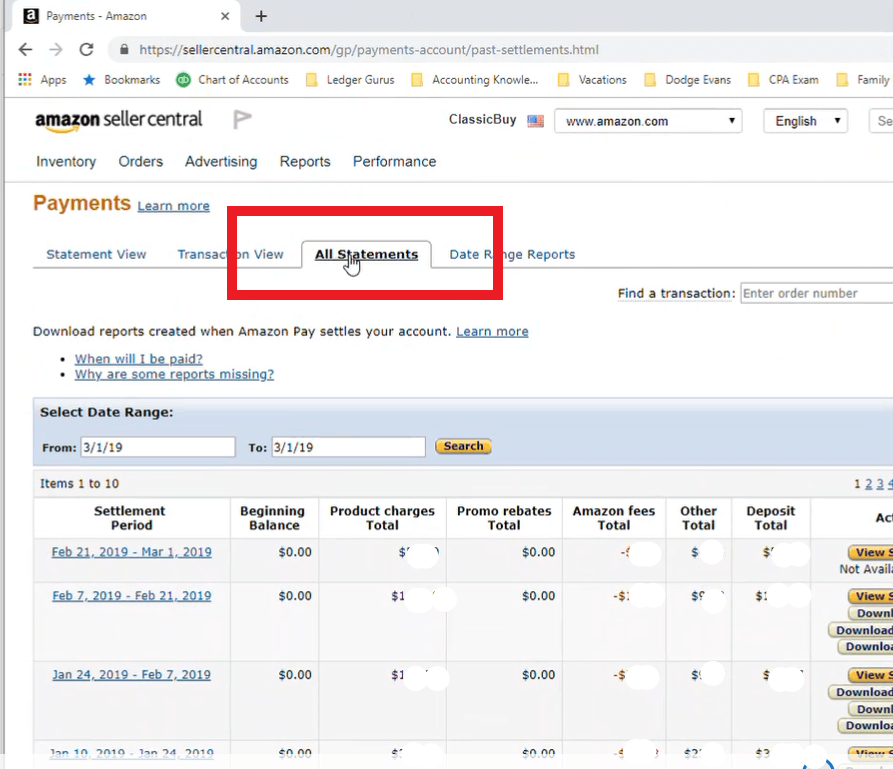
 And then click on the “All Statements” tab.
Under the actions section I would find the applicable report date range; In this example we will use the range Nov 15- Nov 19. As you can see we can see that Nov 15- Nov 19 didn’t come over.
To fix this click “Request Report“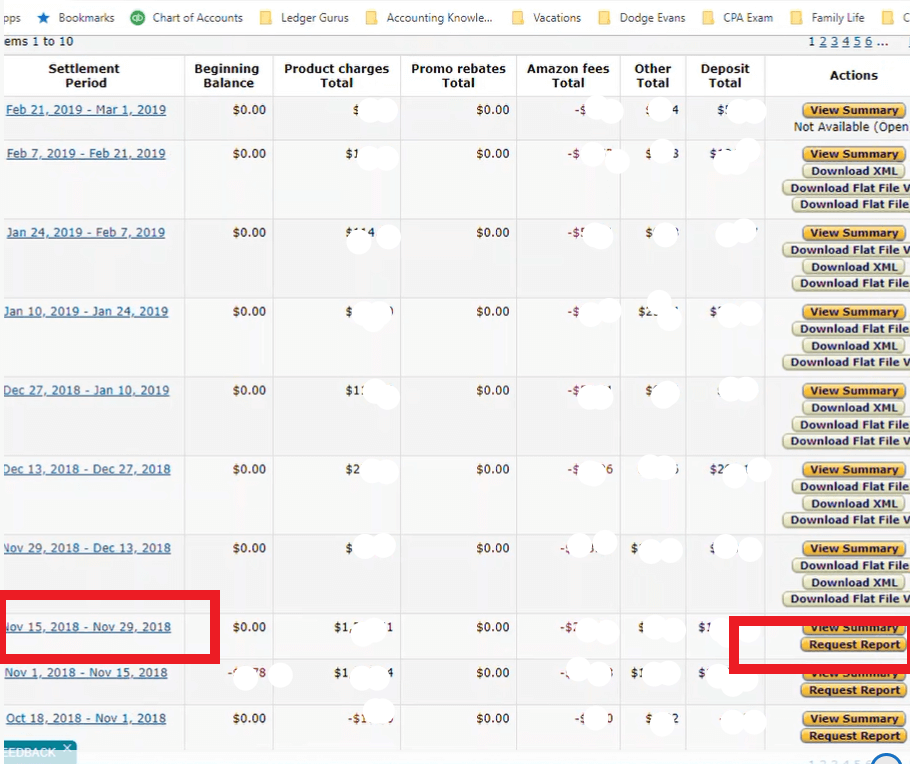
Then it will come up with a little message that says that it is working on generating and retrieving that report. It shouldn’t take too long depending on how many transactions are on that report. (For example, if it’s a bigger client it could take a couple of minutes. If it’s a small client it could take a couple of seconds.)
Return to you A2X screen.
Click on “Settings”.
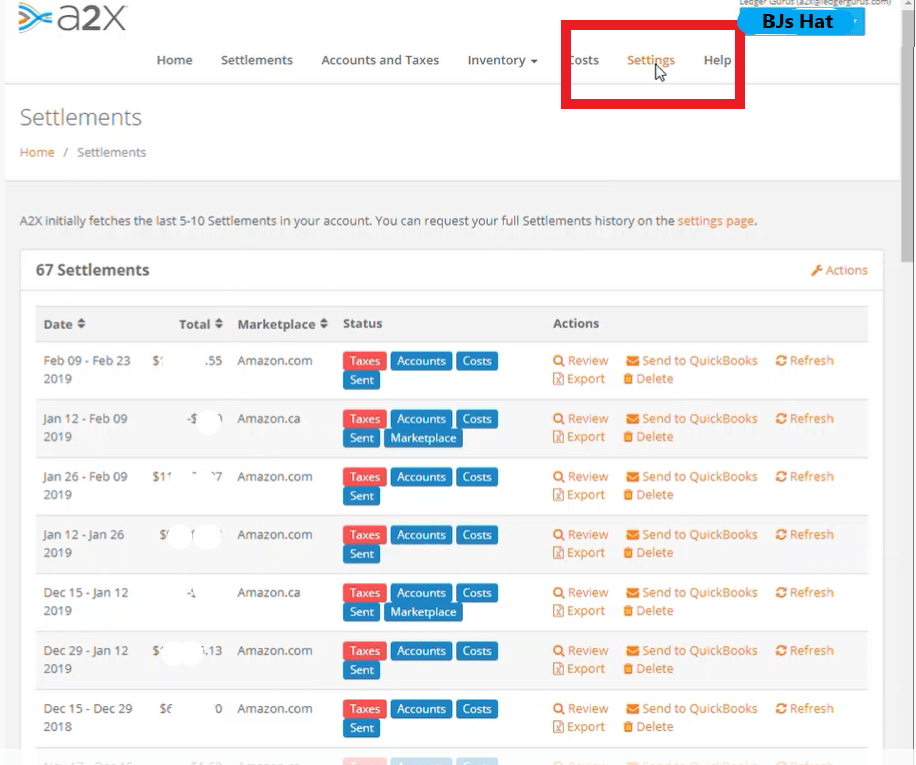 And then click on “History“.
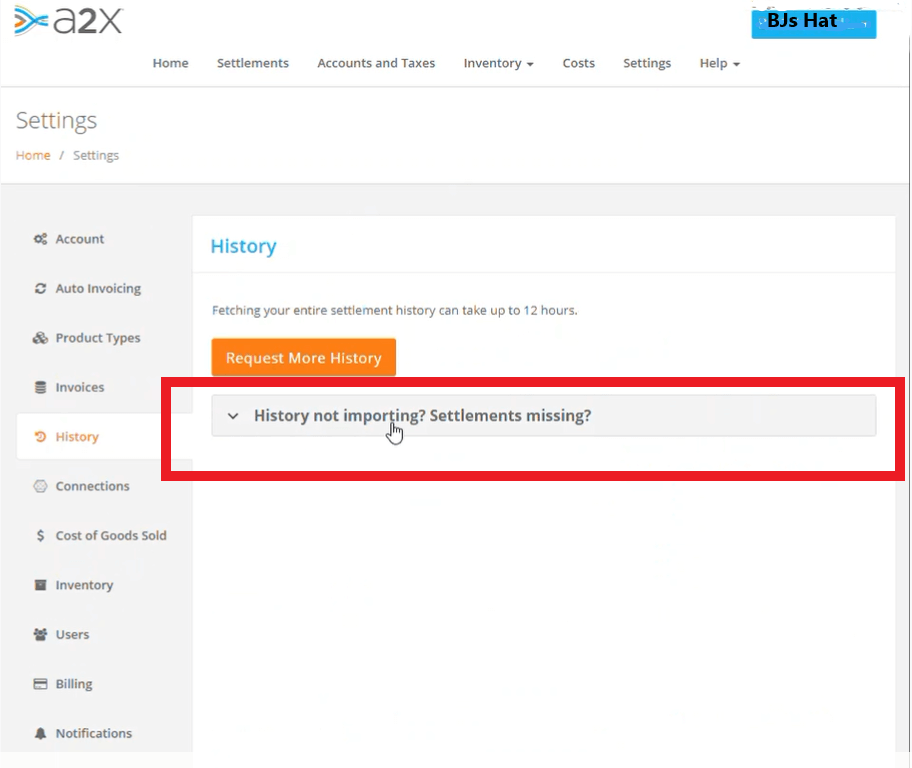
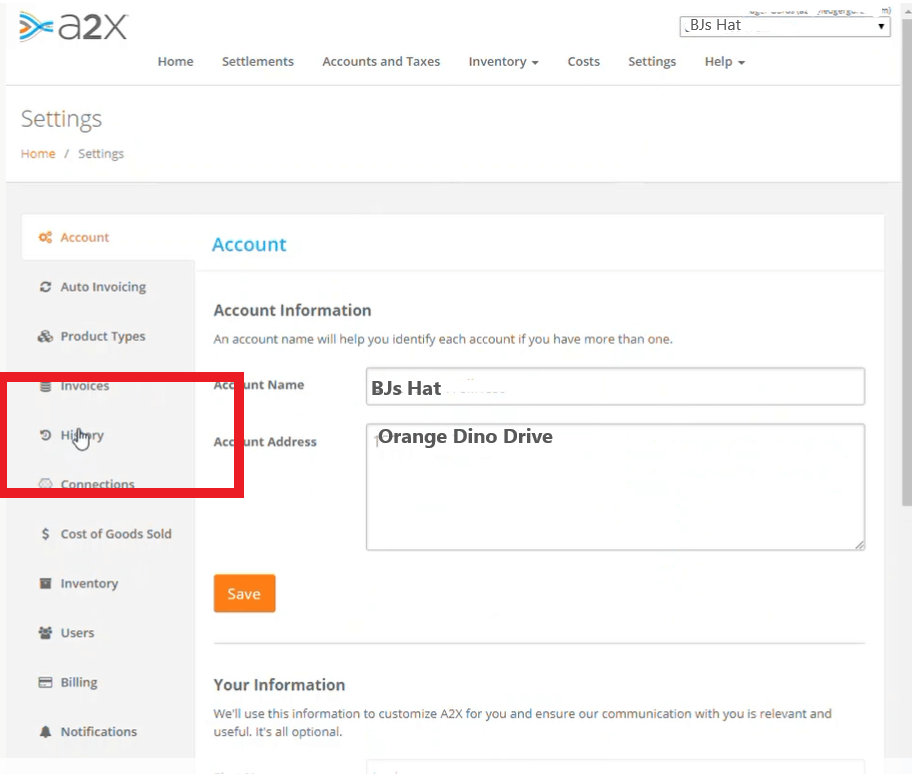 Click on “History not importing, Settlements missing“.
 Instructions for retrieving those missing Nov 15-Nov 19 settlements will pop up
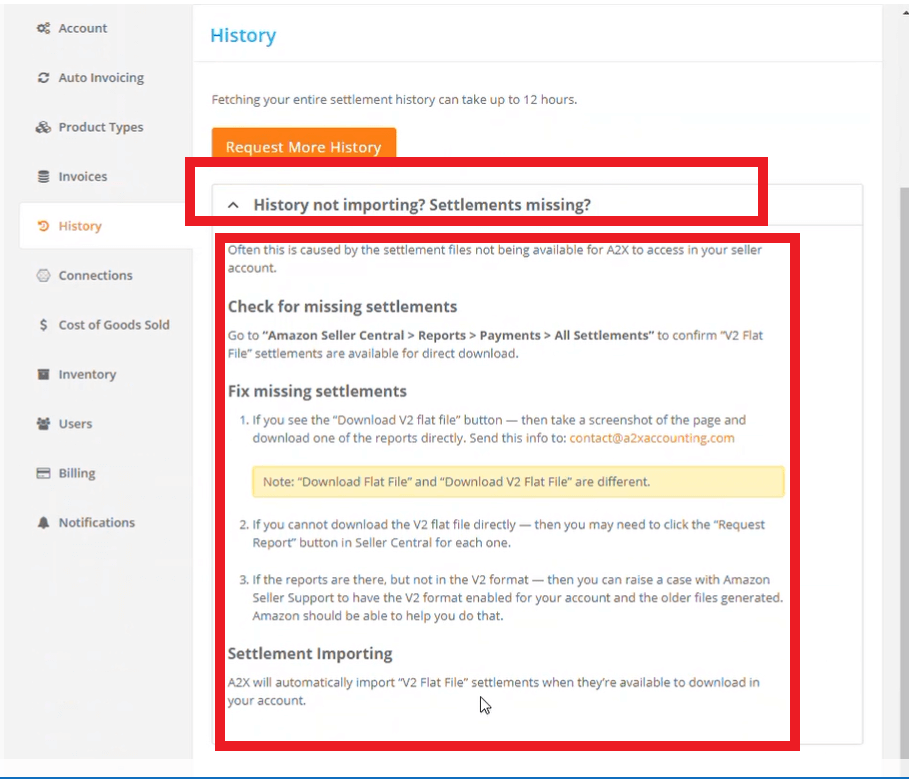
At the bottom of these instructions it will say “Settlement importing: A2X with automatically import “V2 Flat file” settlements when they are available to download in your account.”
This means that with Amazon you don’t have to go to back to connections and click refresh Amazon Connection. As soon as the settlements are available in the V2 Flat File format, A2X will pull them over .
RECAP: Connecting A2X with Amazon
In this blog on how to connect A2X to Amazon, we discussed two ways to initiate the connection process:
- Through the Homepage
- Through “Settings“
We then described the process for connecting A2X to Amazon if the A2X admin doesn’t have Amazon admin credentials:
- Granting A2X access to the Amazon admin as a “User”
- Sending the Amazon admin an email invite to connect Amazon
And last but not least, we talked about the importance of having settlements in V2 Flat File format so that they can be pulled over correctly from Amazon into A2X.
If You’d Rather Not Do This Yourself
If you’d rather not do this process yourself and you’d rather have the professionals do it instead, you’re in luck! We have a service doing exactly this. We can connect your Amazon store to your A2X account, and then connect that to your QuickBooks Online account. This will make your ecommerce accounting so much easier.
Whichever way you decide to go, though, connecting Amazon to A2X can simplify your Amazon accounting, creating a foundation for future success!


