Collecting and filing sales tax can be confusing for ecommerce businesses, and sometimes the hardest part is knowing where to start. This guide will show you a simple way to find and understand your Amazon sales tax report.
Before we get started, would you like some good news?
Due to marketplace facilitator laws (These are awesome sauce for e-commerce sellers!), Amazon is responsible to collect and remit sales tax for its sellers in all states that require sales tax. (Missouri was the last one to jump on the bandwagon on January 1st, 2023.)
Woohoo! Happy dance!
But you’re not off scot-free yet.

Be aware that most states count the sales from marketplaces, like Amazon, AND other sites, like Shopify, towards their economic nexus thresholds. This means that if you sell on a non-marketplace site, you must count the sales from Amazon towards your sales totals for each state.
In this blog, we’ll cover:
- What is an Amazon sales tax report?
- How to find and export your Amazon seller sales tax report
- Breakdown of key information in your Amazon sales tax report
- Learning to read your Amazon sales tax report
- How to use the Amazon sales tax report to remit sales tax correctly
- Choosing the right sales tax team
- Sales tax FAQs
For additional information: To see which states you’re responsible for, read our post about economic nexus laws.
 Key Takeaways
- Amazon collects and remits sales tax, but you still need to track sales for nexus if you sell on other platforms.
- Download your Amazon sales tax report from Seller Central under the Tax Document Library.
- Focus on key columns like dates, tax responsibility, and ship-to state to simplify the report.
- Use a pivot table to quickly summarize tax amounts by state for compliance or analysis.
- Even with Amazon collecting tax, you may still need to register and file based on your total multi-channel sales.
What is an Amazon Sales Tax Report?
The Amazon sales tax report shows how much sales tax Amazon collected from your customers for each transaction. It provides a breakdown of the taxes collected by 4 jurisdiction types:
- State
- City
- County
- Special district
It will look daunting at first, especially since each transaction takes up at least 3 rows, sometimes more.
But we’ll walk you through it, pointing out which ones you ACTUALLY need to pay attention to for sales tax (it’s less than 10!).
How to Find & Export Your Amazon Seller Sales Tax Report
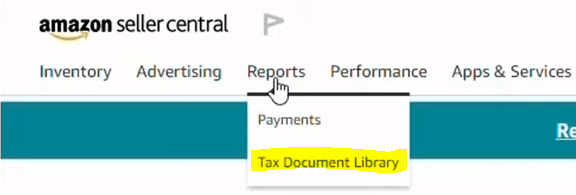
Your Amazon Sales Tax Reports can be found in Seller Central. Click on ‘Reports’ and then click on ‘Tax Document Library’.
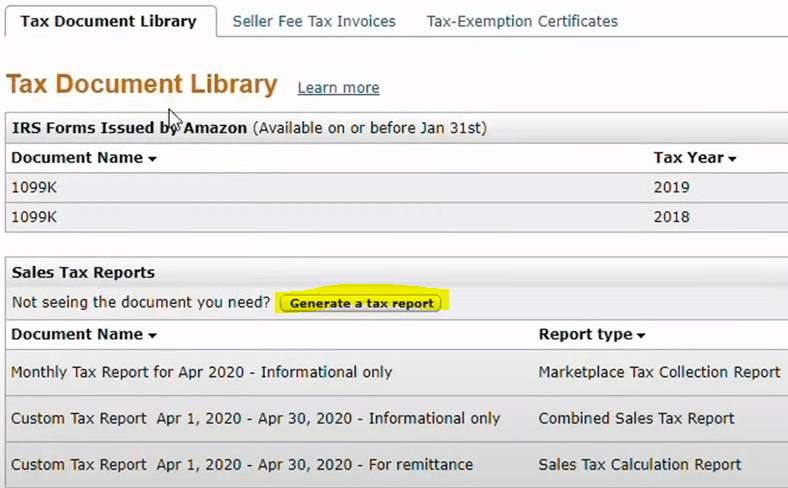
From here, you can view and download your reports.
Under ‘Sales Tax Reports’, you will see documents that are already available, or you can click on ‘Generate a Tax Report’.
Let’s assume you choose to generate a report.
When you click on ‘Report Type’, it’ll drop down with three options. Each has a different purpose and it’s important to know the differences.
- Sales Tax Calculation Report – This report shows YOUR sales tax liability. This is YOUR responsibility, as the seller, to report & remit
Note: Alaska, Delaware, Montana, New Hampshire, and Oregon (sometimes called NOMAD states) do not have states sales tax. However, Alaska has a local sales tax and Montana has a local resort tax, so you may be responsible to remit tax in certain cities. Also, you may have sales tax responsibilities in US regions, like Guam.
- Marketplace Tax Collection Report – This report shows AMAZON’S sales tax liability. It is AMAZON’S responsibility to report & remit this.
- Combined Sales Tax Report – One place to see it all!
If you are doing a nexus analysis and need to know all of your Amazon sales to add to sales from other channels as well, download this report.
By the way, since the Wayfair decision in 2018, Amazon has slowly added states it collects for as marketplace facilitator laws have been put in place. These laws are not retroactive. That means, for instance, if you had nexus in Florida prior to July 1, 2021, you are responsible for remitting sales tax on those sales. However, after that date, Amazon has been taking care of it.
After you decide which report you want, choose the reporting date range you want and click ‘Generate’.
- If you’re doing a monthly sales tax filing, choose the previous month.
- If you’re doing a nexus analysis, choose the previous 12 months (called a trailing 12) or the previous year.
The report will be generated, and you will see it under ‘Sales Tax Reports’. Once you locate the report, hover over it and click ‘Download Tax Report’ to access all the details.
For an updated list of economic nexus thresholds and effective dates by state, download our 10 Steps of Sales Tax Guide. There is an appendix at the end with all this information.

Breakdown of Key Information in Your Amazon Sales Tax Report
It’s important to understand the key information contained within your Amazon seller sales tax report. Amazon provides a helpful summary of what to look for in its reports which includes:
- Sales breakdown by transaction type
- Tax collected on those transactions
- Total amount due to respective state
- Product and Shipping charges assigned to individual customers
- Return & Refund breakdown details for sales made during the period
- Any applicable processing fees
Learning to Read Your Amazon Sales Tax Report
This report has LOTS of columns, and it can be incredibly confusing if you don’t know what you’re looking for. We’ve broken it down and pointed out which ones you need to pay attention to, at least for your sales tax compliance.
Quick Excel tip: To easily expand all the columns so you can read the headings, click on the triangle in the top left corner of the spreadsheet to highlight the entire spreadsheet. Then double click on the right line of any of the lettered column headers (like A or B, etc.) to automatically expand all the columns.
Transaction Details (Columns A – F)
The most important info here is the:
- Order Date (Column B) – When the order was placed by the customer
- Shipment Date (Column D) – When the order was sent by the seller
- Posted Date (Column F) – When the order was received by the shipping company (these last 2 will be pretty close to each other.)
![]()
Note: It doesn’t really matter which one you use for your accounting purposes. Just be sure to be consistent to minimize confusion with your revenue reporting. For our customers, we usually use Posted Date.
Marketplace Details (Columns G – N)
The most important info here is:
- Tax Collection Model (Column M) – Shows if a Marketplace Facilitator is responsible for remitting tax or not
- Tax Collection Responsible Party (Column N) – Shows exactly which party is responsible
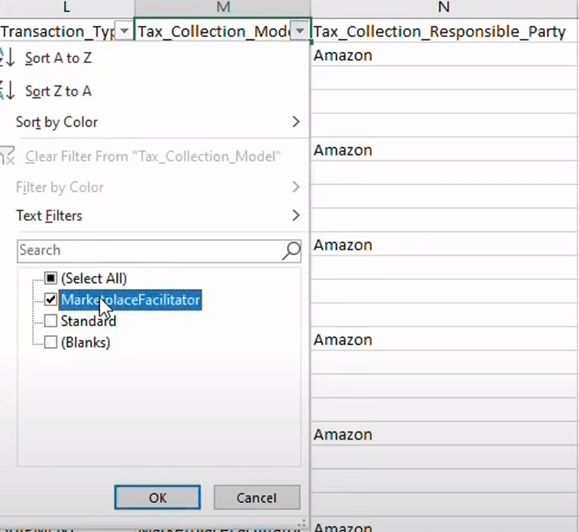
Click on the down arrows to filter the data. When the filter on column M is on Marketplace Facilitator, the responsible party is Amazon. When it is set for Standard, the responsible party is the Seller. This is a transaction YOU need to report.
Product & Tax Details (Columns O – Y)
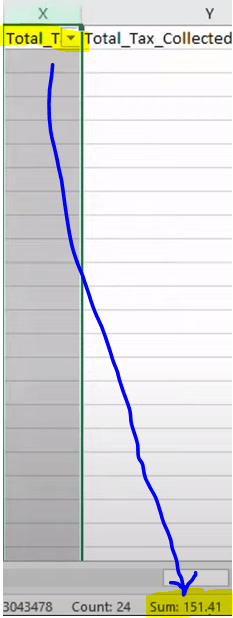
This area gives details about the product selling price and the tax collected. The most important column to pay attention to is Total Tax (column X). This is the seller’s sales tax responsibility to remit to the states.
Note: When you click on the whole column to highlight it, you’ll see the sum total listed at the very bottom of your screen.
Shipping Details (Columns Z – AN)
The next part shows where your inventory was shipped from and shipped to. With ecommerce, the sales tax is usually determined by where the item is shipping TO, not from.
In other words, the ‘Ship To’ address determines the sales tax rate, not the ‘Ship From.’
Here’s an interesting tidbit… Remember the 4 jurisdictions mentioned earlier – state, city, county, and district? That is determined by the customer’s zip code. In some places, each of those has its own sales tax percentage. You can see those percentages broken out in:
- Tax Amount Collected by Amazon (Column BB)
- Taxed Jurisdiction Tax Rate (Column BC)
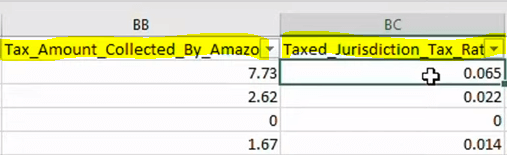
The totals match the amount listed in Total Tax (column X).
How to Use the Amazon Seller Sales Tax Report to Remit Sales Tax Correctly
We get a lot of questions about how to report sales tax collected by Amazon. Since every state with state-wide sales tax laws already has marketplace facilitator laws in place, you won’t need to do this part if you only sell in the US and on Amazon.
However, if you sell on other channels as well, you definitely want to read this next part because it’s vital when doing a nexus analysis to be able to determine where you have economic nexus.
Opening a pivot table will allow you to summarize by state how much you’ve collected in sales tax and need to remit.
Now, before you panic wondering what a pivot table… don’t worry, we’re going to show you how to set this up. This part is not in the original YouTube video, but hopefully the screen shots and explanations will make it easy to understand.
Before we continue, you may be asking “What is a pivot table?”.
Great question! It is a summary of your data, packaged up nicely in an easy-to-read chart so you can see at a glance what you need to see. Believe me, you will be very glad you learned how to set this up!
Preparing to Create a Pivot Table
This is a several step process, but it’s pretty straightforward. Before you can create the pivot table, though, there are a few steps you need to do first.
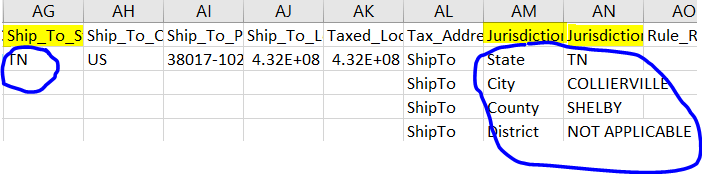
It’s important to remember that the Ship To State (column AG) is associated with the state, city, county, and district jurisdiction info (columns AM and AN).
Remember how we said at the beginning of this blog that each transaction takes up at least 3 rows. This is why.
Because of this, you need to make sure that all the orders are associated with the correct state, even if not all the cells are filled in column AG.
To make sure everything is associated correctly, temporarily insert a new column. Label it ‘MODIFIED Ship_To_State’.
Note: To help you remember that it’s modified, you can make it a different color to differentiate it from the rest of the report.
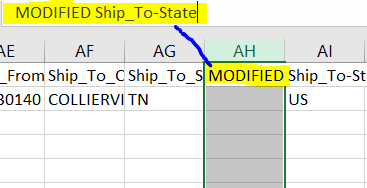
Enter conditional formatting in the first cell of the modified column (column AH here) by typing in:
=if(AG2=0,AH1,AG2)
This means that if a state is specified in column AG, put it in AH. If a state is not specified in AG, go up to the next state that is specified and add that to column AH.
This will result in the first cell in the column filling in with the correct state. To auto-fill the rest of the column, left-click on the bottom right-hand corner of the cell (yellow square in the screenshot).
All the columns will now have the correct states filled in.
You’re all set and ready to create your pivot table!
How to Create a Pivot Table
Highlight the entire table by going up to the very top left corner of the table and clicking on the gray triangle. (You did this earlier to expand all the column headings.) Don’t forget this step! You’ll be very confused if you do.
Scroll to the top of the page and click on ‘Insert’. Then click on ‘Pivot Table’ on the far-left side of the menu.
The pivot table range will default to the entire table. That’s good. Next, choose New Worksheet for where you want the pivot table placed. Click OK.
Your shiny new pivot table will pop up. Label it Amazon Pivot Table so you know what you’re looking at when you come back to it later.
Summarizing the Data with Your Pivot Table
Now you’re ready to start summarizing data. This is where you decide which rows and columns you want included in the table. On the right side of the worksheet, you’ll see a list of fields, as well as boxes down below that you can drag and drop your selected fields into.
- Under Rows, drag and drop MODIFIED Ship_To_State (this is so your rows can be labelled with the correct states).
- Under Values, drag and drop:
- Tax Exclusive Selling Price (the cost of the products being taxed)
- Tax Amount (the amount actually taken out for taxes)
- Tax Amount Collected by Amazon (to make sure they didn’t collect anything for the states you have listed)
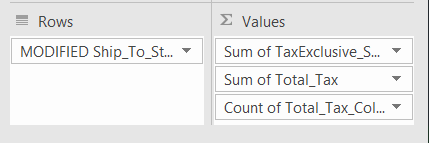
This is what your completed pivot table will look like:
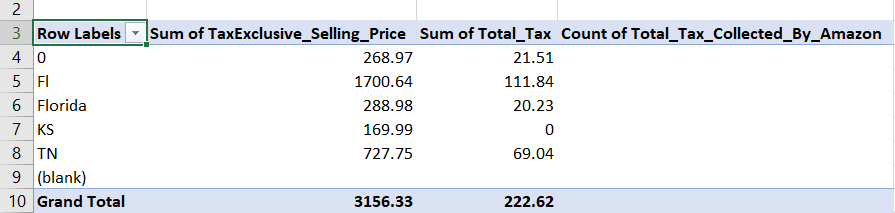
There are plenty of other ways you can filter this pivot table and get other information you may need, but this is the basics of what you need.
Tips for Navigating Your Amazon Sales Tax Report with Ease
Understanding your Amazon Sales Tax Report should be a straightforward process, but it can still be overwhelming at first. In summary, here are some tips to help make this process easier:
- Read the report thoroughly before filing
- Make a pivot table to summarize the data
- Look out for potential errors
Choosing the Right Sales Tax Team
If you have more questions on sales tax in general, download our 10 Steps to Ensure Sales Tax Doesn’t Burn Down Your Ecommerce Business guide. It will walk you through the process from beginning to end.
If you are thinking, “Man, this is a serious pain in the neck! Can’t I get someone to do this FOR me?!?”, you may want to consider hiring a team of sales tax gurus to take over for you.
If you want the peace of mind of knowing that you are registered in every state you have economic nexus with, that your sales tax is being filed correctly and on time, and that you’re fully in compliance with all the sales tax laws – without it taking tons of your time every month – let us know.
LedgerGurus has been on the forefront of sales tax compliance since the Wayfair decision in 2018. We have helped hundreds of businesses become and stay compliant.
Our team does nexus analyses, registrations, channel setup (for non-marketplace channels), and remittance.
We are experts on US sales tax.
If you’re an ecommerce business, we’d love to chat about how we can help make sales tax compliance easier for you.
What to Read Next: How to Record Amazon Sales in QBO
 ____
____
Sales Tax FAQs
Do I need to report sales tax from Amazon?
No, Amazon is collecting and remitting sales tax for all states that have state wide sales tax and marketplace facilitator laws. There are 5 states that do not have these laws – Alaska, Delaware, Montana, New Hampshire, and Oregon (sometimes called NOMAD states). However, Alaska has a local sales tax and Montana has a local resort tax, so you may be responsible to remit tax in certain cities. Also, you may have sales tax responsibilities in US regions, like Guam.
Does Amazon file sales tax returns for sellers?
Yes, Amazon files sales tax returns on behalf of sellers.
Do I need a sales tax permit if I sell on Amazon?
No, but you should at least have one in your own state. For more information on registrations, read How to Register for a Sales Tax Permit in the US – What You Need to Know.
Do I need an EIN to sell on Amazon?
Yes, or a SSN if you are a sole proprietorship. If you are non-US-based seller, we recommend you download our guide 5 Steps International Sellers Must Take BEFORE Applying for a US Sales Tax Permit.
Does Amazon 1099 include sales tax?
No, it does not. It only includes your net (taxable) income. For more information, watch our video Amazon 1099 vs Financial Statement Activity | Amazon Bookkeeping Tips.
Does Amazon collect sales tax for sellers?
Yep, and it files the sales tax, too. Phew!
For more FAQs, read our Online Sales Tax FAQs.