Whether you’re a newbie or a seasoned Amazon seller, understanding how to bring the sales data from your Amazon business account into your QuickBooks account is crucial.
But first you need to understand WHY it is so important, why deposits are not the same as net income, and how it impacts your profitability and visibility into your business.

In this blog, we delve into three methods of recording Amazon sales in QuickBooks Online (QBO) and we’ll cover:
- Why Amazon accounting is different from regular accounting
- How to get Amazon sales data into QuickBooks Online
- Method 1: Simplified method for startups
- Method 2: Recording Amazon activity in detail for growing businesses
- Method 3: Leveraging technology for established sellers
- Apps to record Amazon sales data in QuickBooks
- FAQs
- How to make accounting work FOR you
Let’s get started.

And for those who prefer a visual guide, check out our YouTube video.
Key Takeaways
- Amazon sales flow through the platform, not your bank, so careful tracking is essential.
-
Choose the right method for your business stage: simple deposits, detailed tracking, or automated integration with apps like A2X.
-
Record deposits, fees, refunds, and categorize transactions correctly to maintain accurate financials.
-
Technology or outsourcing can save time and ensure reliable accounting.
-
Update your accounting approach as your business grows.
Why Amazon Accounting is Different
The challenge with ecommerce accounting is that it is fundamentally different from any other type of accounting.
Unlike traditional businesses where financial activity is primarily routed through bank accounts, in ecommerce, financial activity flows through your sales channels, not your bank accounts.
There are different methods of ecommerce accounting, and where you are in your business will determine which one is most likely to work best for you now.
As your business grows, your accounting needs evolve. The method suitable for a startup might not be right for a business with millions in annual revenue. Hence, it’s essential to assess where you stand and choose accordingly.
How to Get Amazon Sales Data into QuickBooks Online
Amazon’s Fulfillment by Amazon (FBA) services definitely simplify the selling process for ecommerce sellers, but also creates some unique challenges.
While managing logistics and deliveries on your Amazon business account becomes easier, it’s critically important to maintain a clear record of your financial transactions. Neglecting this can lead to potential long-term issues.
So, what’s the best way for an online store to improve its accounting?
Before we go any further, please note that syncing your Amazon seller central account directly with QuickBooks Online is a bad idea.
For more information on why that is, read Shopify QuickBooks Integration | Rethink the Sync!. Yes, the blog references Shopify, but the concept is the same.
Make your life easier and DON’T DO IT! We’ll show you 3 other ways that work much better and with a lot less hassle.
Before diving into the methods, it’s essential to understand how Amazon processes payments.
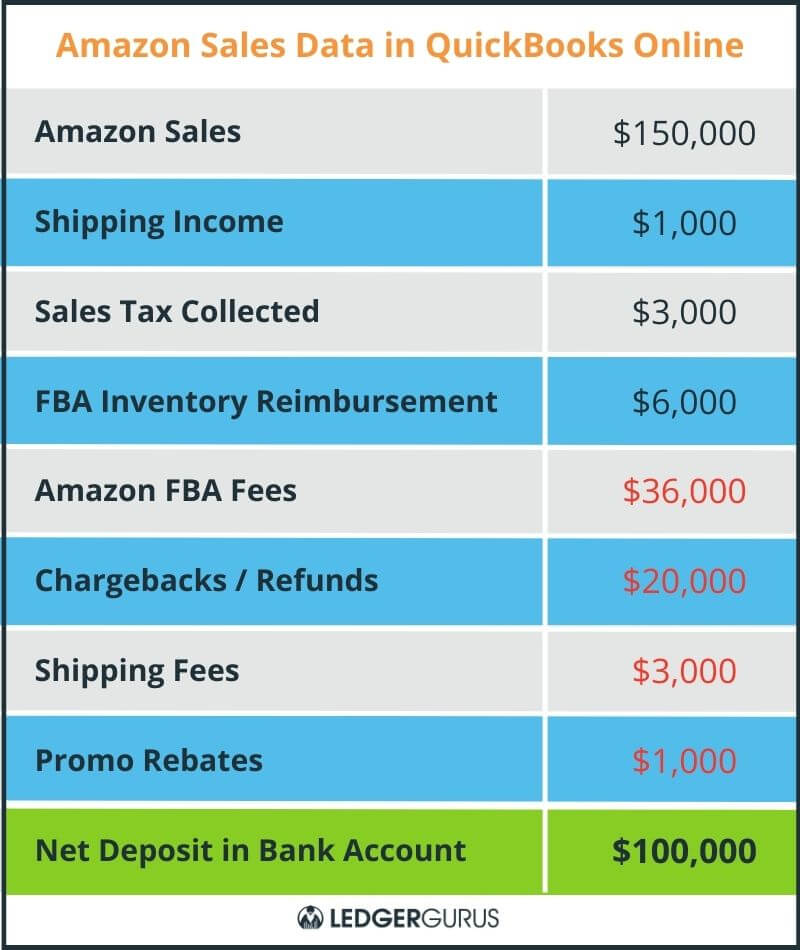
Amazon deposits sales proceeds into your bank account every two weeks. This deposit is a consolidated summary of all activities, including orders, refunds, shipping services, selling fees, and more, over the past two weeks.
All of this is lumped into one deposit. The method you choose will determine how you record these activities.
One really important thing to keep in mind is that what works well at one stage of your business probably will not work as well for another stage.
So, we suggest asking yourself 3 questions to narrow down which method is best for you right now:
- How big is your business right now?
- Where does getting financial data fall on your list of priorities?
- What kind of decisions are you trying to make with this data?
We’ll look at three different scenarios and methods to see which one may be a fit for you. Those methods are:
- Record Amazon cash deposits as “sales income” in QuickBooks Online
- Record Amazon activity in detail
- Integrate with Amazon accounting apps to automate the recording process
Method 1: Simplified Recording for Startups
In this method, you simply record Amazon cash deposits as “sales income” in QuickBooks Online.
This method is best for:
- Small Amazon sellers who are just getting started
- Sellers making less than $100K per year
If this is you, you are in the throes of figuring out how to build your business. You are driving revenue, learning how to market effectively, figuring out how to design a great product and source it, figuring out how to work with your vendors…
Your to-do list just goes on and on and on! These activities are significantly more important to the life of your business than spending hours digging into all the details of your e-commerce accounting.
You just need to know if your small business is making or losing money, and then have something to hand to your accountant at the end of the year so you can fulfill your obligation to the tax man.
The Method
We’ll assume you are using QuickBooks Online (QBO). You’ve synced your bank accounts and your credit cards, and now the transaction data is flowing into your Banking Center.
- Find your “Amazon Settlements” deposit.
- QBO will probably default to the category of Sales of Product Income, and that is totally fine. Or, you can change it to Amazon Sales or whatever makes sense to you.
- After you decide where you want to put this deposit, just click Add. It will hit your financial statements and you’re off and running!
Pros and Cons of Method 1
This is by far the simplest, least time-consuming option. And at the end of the day your net income is correct.
Some cons of this method are that it doesn’t give you a whole lot of detail, creates some timing issues, and it skews your margins at the gross profit level.
There is a lot of information that you’re not seeing, and that information is important if you’re trying to make decisions about your ecommerce business, but you may not need to know all that detail right this minute.
If you’re making over $100K a year AND you’re scaling your business AND trying to use your financial statements to make good decisions, you probably need to look at the next method for recording Amazon sales data in QuickBooks Online.
Method 2: Recording Amazon Activity in Detail for Growing Businesses
For Amazon sellers making between $100K-$500K a year, this method offers a balance between simplicity and detail.
You’ve worked hard and you’re starting to get the hang of all this. But you still don’t have time to spend hours analyzing a long list of numbers on an Excel spreadsheet to figure out the data you need.
Hey, we hear you and we’ve got your back!
(By the way, this may be a good time to consider outsourcing your accounting.)
This method involves categorizing Amazon sales data in QuickBooks Online, providing insights into various income and expense categories but without having to go crazy getting it.
Basically, the only difference is that you’re going to break out your Amazon accounting information into categories instead of lumping it all into one line item.
You’ll be better able to see important data, like the following:
Heads up! This method does require a journal entry in QBO. (Actually, don’t let this scare you off. We’ll walk you through it to make it so simple and easy that you’ll be shouting from the rooftops that you can make journal entries like a pro now! Go YOU!!)
The Method
Step 1. Download your settlement report from Amazon:
Sign into your Amazon Pay account on Seller Central.
- Click on the reports menu, and then click payments.
- On the Statement View tab, a view of your current open settlement appears.
- To view and download copies of your settlement reports, click the All Statements tab. Click the buttons to view or download the applicable reports.
On this page you’re going to see all the order activity, refunds, shipping information, selling fees, and any other transactions that have happened in the past 2 weeks. Notice that the number at the bottom is what was deposited into your bank account. So, now you’re going to put all this accounting goodness into a journal entry.
Step 2. Create a journal entry in QuickBooks Online
- Click on the + NEW button in the left menu of QBO. Under the “Other” category, select Journal Entry. Inside the journal entry window, you’ll see Accounts, Debits and Credits.
- Date: Enter the date for the journal entry.
- Journal Number: QBO will automatically assign a journal number. You can keep it or enter a new one.
- Accounts: Select the accounts affected by the transaction.
- For instance, you can lump all the Order info together, the Refunds together, etc., OR you can do individual line items. What level of detail do you need?
- Amounts: Enter the amounts in the debit and credit columns.
- You can map all these line items however you want to inside of QBO. Do what makes sense to you. Rule of Thumb:Black = Credits (money coming in)Red = Debits (money going out)
- Description: Add a description to provide more details about the transaction.
- Name: Optionally, associate the transaction with a customer, vendor, or employee by selecting a name.
If you’ve done all your debits and credits correctly, the total should default to the amount that’s being deposited.
Note: You can also generate and download custom reports from the Date Range Reports tab.
Pros and Cons of Method 2
This method gives you more detailed insights, better categorization, and a clearer financial picture.
The biggest problem with this method is the timing issue. For example, if Amazon is depositing into your account every 2 weeks, it may not always line up neatly with the end of the month.
What do you do if you get a deposit on the 5th? Most of that revenue is actually from the previous month.
If you’re watching the trends of your business, trying to close out a month and match your income with the cost of goods sold (for more information, read Cost of Goods Sold | A Key Number for eCommerce Businesses), you’re really going to care about period-ending stuff.
Also, this method doesn’t give you a lot of control over seeing all the detail of what’s going on behind the scenes.
Did you know there’s literally over 400 different line items of how Amazon can be bringing money in and taking money out?
To figure all that out, you’re going to have to do a deep dive into the back-end reports, and sort it out according to date, and then sort that according to activity, and then…
Is your head spinning yet?
Ours, too! But Method 3 will help you get everything under control.
Method 3: Leveraging Technology for Established Sellers
This method is for established Amazon sellers, usually doing more than $500K in annual sales, though there is nothing wrong with putting this method into place sooner.
You have been doing your business long enough that you know you need to make your accounting be a source of truth for you.
Some of the complaints we hear from people before they start working with us are:
- My accounting is not a source of truth for me.
- None of this looks right to me.
- My accounting doesn’t match the reports coming off my channels.
- I have no idea what’s really happening.
You’re at the point in your business where you need to do a deep dive into the Amazon activity, as well as every other channel you’re selling on.
This is so you can make your accounting become a source of truth for you now, and so you can reference it later to get really good, solid data.
Remember, good data makes good decisions possible.
Apps to Record Amazon Sales Data in QuickBooks Online
This requires a highly sophisticated knowledge of Amazon and your accounting tools OR a much better alternative is to attach a tool that will allow you to sync the two systems together.
In an attempt to save you hours of learning and mastering time, let us introduce you to some tools that make this easy and affordable:
- Go to your Apps in QuickBooks Online.
- Type in Amazon, and it’ll bring up a list of applications that integrate with Amazon and QuickBooks Online.
- Our favorite is A2X (view our A2X video here), though there are lots of others, too.
- When you click on an app, it’ll take you to an overview, usually with a quick video to show you how it works, and what it costs.
Or, if you still don’t have the time to dig into all this, remember that outsourcing is always a great option. Come talk to us. This is what we do best!
When you look at the pricing, you’ll see that these apps are very reasonably priced for the work they’ll be doing for you.
It is worth it to invest a little money to save yourself hours and hours of time figuring out your accounting with spreadsheets and columns and numbers and all that. Ugh!
FAQs
How do I do a QuickBooks integration with my Amazon account using A2X?
We have tutorials here and here, but the easiest, most surefire way is to let us do it for you.
When is it time to hire an ecommerce accountant?
When you need a higher level of detail and insight than you’re getting with your current solution, it’s time to consider outsourcing your accounting to an ecommerce specialized accountant.
What should I look for in an Amazon accounting solution?
Not all accountants and bookkeepers are created equal. As your business grows and increases in complexity, it’s important to find one who knows the intricacies of ecommerce accounting inside and out.
What else do I need to pay attention to with my Amazon accounting?
To get the most insights into the financial side of your business, you need to make sure that certain activities are being taken care of. We have an ecommerce bookkeeping checklist with all those activities, what they are, and how often they should be taken care of. Use it to make sure you’re doing everything you need to do or as a way of making sure the person doing it for you is covering all the bases.

How to Make eCommerce Accounting Work for You
Phew! That was a lot, right? But if you’ve made it this far, congratulations—you’re well on your way to mastering the art of recording Amazon sales in QuickBooks Online.
Let’s quickly recap:
- Start Simple: For the small Amazon sellers just beginning their journey, record those Amazon cash deposits straight into QuickBooks as “sales income.” It’s straightforward and gets the job done without pulling your focus from growing your budding empire.
- Detail Matters: As your store begins to flourish (hello, $100K milestone!), it’s time to dig a little deeper. Break down those Amazon transactions into detailed categories. Sure, it involves a few more clicks and perhaps a journal entry or two, but think of it as fine-tuning your financial engine.
- Tech to the Rescue: For the seasoned sellers crossing the $500K threshold, or for sellers who want to get all their accounting ducks in a row earlier than that, leveraging technology like A2X will streamline the chaos. This method isn’t just about keeping records; it’s about making your accounting data a reliable compass for decision-making.
Remember, each stage of your business may require a different approach to accounting. What works at one stage may be a hindrance in another.
Now, what if you could skip the stress of mastering every detail and focus solely on scaling your Amazon empire? That’s where we come in. Our team at LedgerGurus specializes in A2X and QuickBooks Online integration. We don’t just set it up; we ensure it’s a seamless, syncopated dance of data between your sales and accounting.
Click here to learn more about our A2X/QBO Setup & Consulting Service.
Why struggle when you can strategize? The right accounting practices can make a world of difference.
Let us handle the numbers, and you handle the sales. Visit our website, drop us an email, or give us a call. Let’s make your Amazon business not just survive but thrive!
If you ready to outsource your ecommerce accounting, reach out to us. eCommerce accounting is our forte!