Dealing with online sales tax can be complicated and confusing. As a Shopify seller, tax compliance is the last thing you want to worry about with your online store, but since it’s a necessary part of selling online, we’ll help you understand the basics of your tax obligations. In addition, we will take you through the steps for Shopify sales tax setup.
Remember, you only want to set up Shopify to collect sales tax in states that you already have registered for a permit in. This is because it is illegal to collect tax in a state you don’t have a permit in, so don’t just go set up all states to collect right from the start.
Also, don’t register for a tax permit in a state you don’t already have nexus in. This just makes things unnecessarily complicated before they have to be. For more information on both of these things, check out these videos: What Online Sellers NEED to Know about Sales Tax Nexus and How to Register for Sales Tax.
In this blog, we’ll cover:
Let’s get started.
 Key Takeaways
- Never collect sales tax in a state before registering. It is illegal to collect tax without a permit, even if you plan to remit it later.
- Only register where you have nexus. Registering in states too early creates compliance headaches and unnecessary tax filings.
- Shopify sellers are responsible for collecting sales tax. Shopify is not a marketplace facilitator, so it will not do this for you.
- Shopify has new tools to track nexus and simplify setup. These include threshold tracking, product categorization, and improved tax reporting features.
How Does Sales Tax Work on Shopify?
Does Shopify collect sales tax for sellers?
Shopify is not required to collect and remit sales tax on behalf of its sellers. Unlike Amazon or eBay, Shopify is not a “marketplace facilitator”. Therefore, Shopify doesn’t fall under marketplace facilitator laws that require stores like Amazon or eBay to collect and remit taxes for its sellers. So, the Shopify seller is responsible for remitting sales tax to the states.
It’s important to remember that a seller doesn’t technically own any sales tax that they collect. These funds are collected from customers by the seller, and then passed on to that state. If you don’t collect sales tax when you should, you’ll have to pay that tax out-of-pocket if the state comes after you, while potentially owing penalty fees.
In what states do I collect sales tax in my Shopify store?
This is a complicated question. Every state has differing nexus laws for when you need to collect sales tax in their state. You need to start by collecting taxes from customers in the state where your business is located (unless you live in Alaska, Delaware, Montana, New Hampshire, or Oregon).
But BEFORE setting up your store to collect taxes in that state, make sure you register for a sales tax permit. We cannot stress enough how important this is for tax compliance!
As your business grows, you will need to start registering, collecting, and remitting sales tax in more states. If you have a “physical presence” (employees, warehouses, etc.) in any state, you will need to register, collect, and remit for sales in those states. Then, as your sales in any state approach $100K or 200 transactions, you will want to check for that state’s economic nexus laws (view economic nexus laws by state here).
Economic nexus is a fancy way of saying that if you are selling a lot of product to customers in a specific state, that state wants you to remit sales tax.
For more help on where you should collect sales tax, watch our YouTube video “eCommerce sales tax | When do sellers need to collect?”.
How to Set Up to Collect Sales Tax in Shopify
Setting up your Shopify store to accurately collect sales tax can be more complicated than anticipated. But here are the basic steps we suggest you go through:
- Tell Shopify where to collect sales tax
- Categorize your products
- Setup your sales tax shipping options
- Tell Shopify which products should collect sales tax
- Add warehouse locations
- Add information for sales tax exempt customers
View our updated guide on how to set up to collect sales tax in Shopify:
Below we’ll walk you through the steps as well.
Step 1. Tell Shopify Where to Collect Sales Tax
First, you need to tell Shopify in what states it should collect sales tax from customers. As referenced above, you should always start with the state your business is located in (after registering for the appropriate tax permit!).
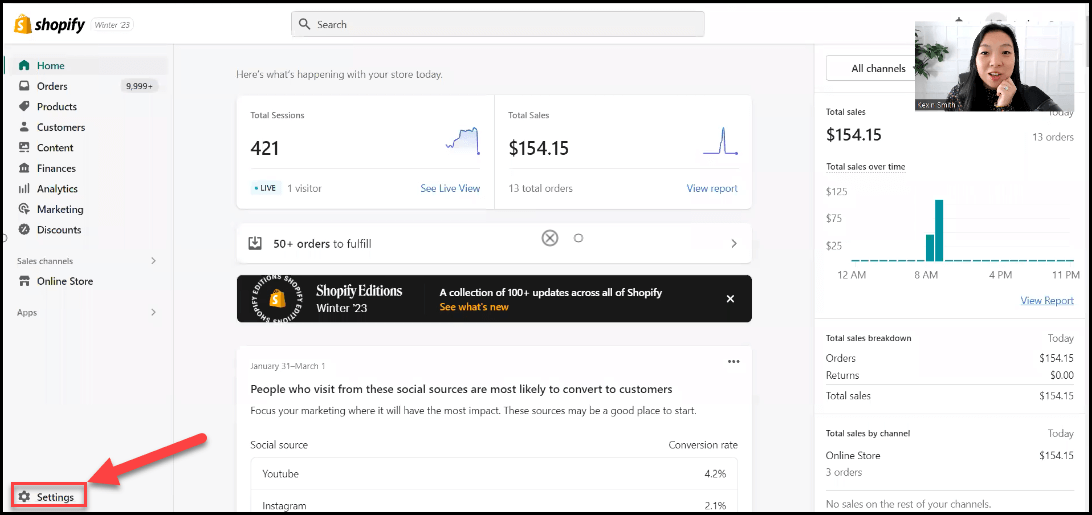
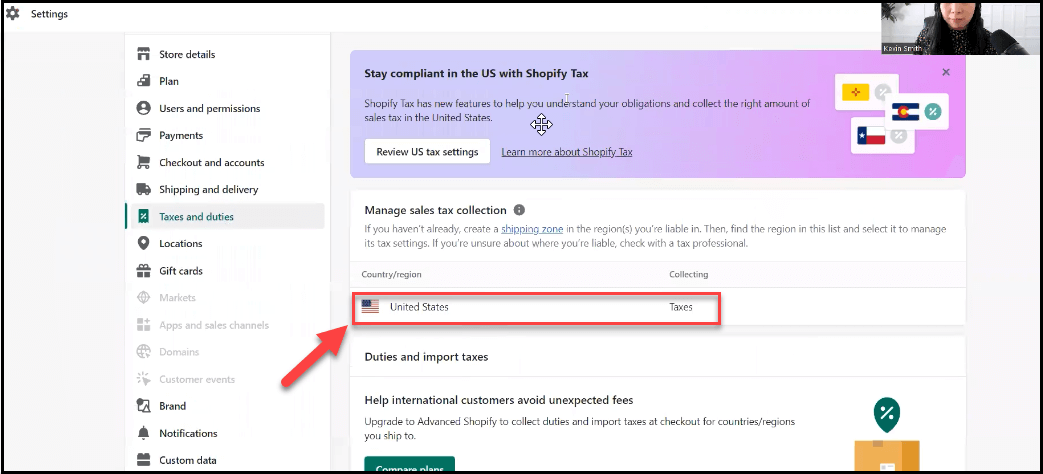
On the home page, click “Settings” in the bottom left corner:
Then click on “Taxes and Duties”:
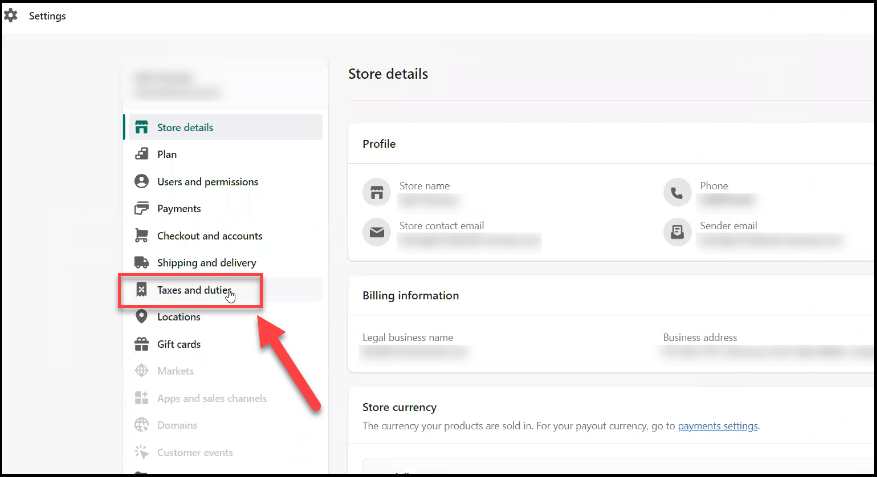
Then click on the United States under “Manage sales tax collection”:
New Options for Shopify Sellers
NEW: Under the United States menu, there are three new options for Shopify sellers.
- Manage tax collection
- Tax rates and exemptions
- Reporting
Let’s explore what’s been added since we made our last guide to setting up sales tax collection in Shopify.
Manage Tax Collection
In this section, you can see what action and monitoring, if any, is required when you’re approaching or have reached the economic nexus threshold for states in which you sell. If you haven’t reached the threshold for a state in which you sell, you’ll see states listed under “No action required.”
When you click on states listed under any of these three tabs in Manage tax collection, you can review sales data and the number of transactions, as well as the respective thresholds for the state. If you’ve met both thresholds, you will be prompted to take the necessary action for the specified state.
Once states reach thresholds, you’ll see them under the “Monitoring required” tab. We recommend paying attention to the action items listed in this section.
Tax Rates and Exemptions
Similar to how Amazon sets up rates and exemptions, this section allows you to categorize all of your products. Since items are taxed differently, you can select products and sort them so Shopify can automatically assign the right tax to each. This eliminates the need to go back and manually override tax rates.
Thankfully, if you overlook this step, Shopify will notify you that you have products that need to be categorized.
Reporting
In our opinion, the option to download tax reports and file taxes in this section is THE BEST improvement Shopify has made for online sellers.
When you enter this menu, you can see where you need to file sales tax and have access to all the information you need for filing. You can conveniently export reports, and see breakdowns by county.
Once you’ve familiarized yourself with the new reports, your next step is to click on “Collect Sales Tax” as pictured below:
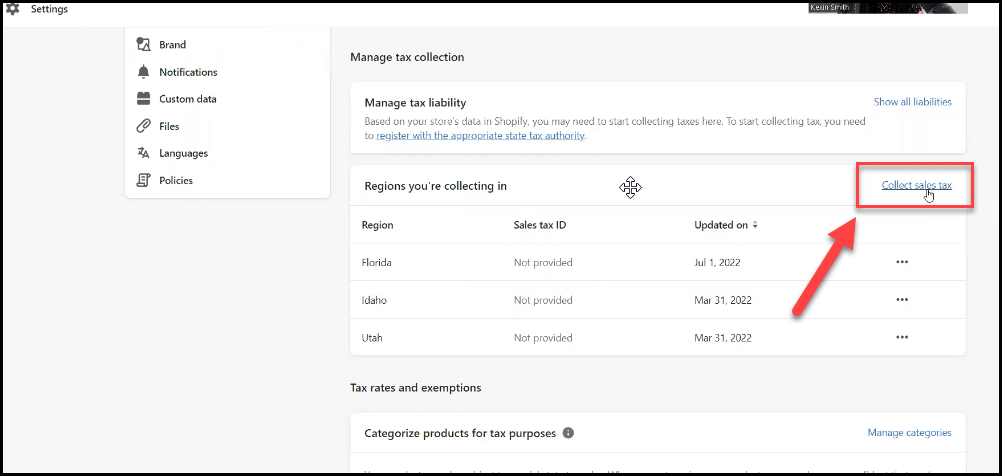
Finally, in the dropdown menu, choose any states where you should be collecting taxes due to a physical or economic presence. Be sure to have your sales tax ID ready to input on this menu. If you don’t yet have that number, you can use your federal employer identification number (FEIN).
Step 2 – Categorize Products for Tax Purposes
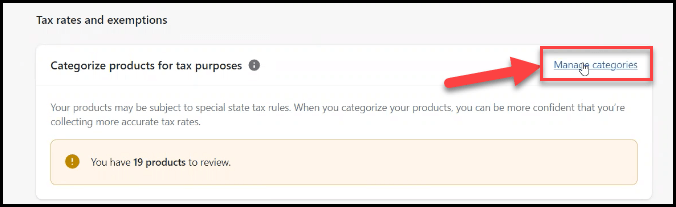
Here is where you will manage categories for your products. If you don’t have products in designated categories for tax collection, Shopify will tell you how many products you need to review.
If you have accurately selected the states in which you’re collecting taxes, Shopify will automatically apply exemptions to products on which sales tax is not collected for certain regions.
i.e. If you’ve added Pennsylvania as a region in which you sell clothing, those products will automatically be exempt from sales tax collection. If you skip adding the regions, you’ll have to select the product override option to create a collection of all clothes and add it to Pennsylvania with 0% sales tax.
Product categorization should collect all the rules in the regions, so you shouldn’t have to spend time with overrides.
Step 3 – Sales Tax Shipping Options
Note: Shopify has mostly integrated shipping and sales tax collection, so it will automatically apply sales tax to shipping in applicable regions. If that’s not the case, shipping overrides are an option when needed.
Step 4 – Tell Shopify Which Products Should Collect Sales Tax
Now Shopify needs to know which products in your store you want to collect sales tax for in the states you have entered. Not all products are taxable. For example, an e-commerce business shouldn’t collect sales tax on gift cards.
States can also have differing laws regarding sales tax (yeah, not cool). For instance, in New York, certain clothing and footwear with a price tag of less than $110 per item are tax-exempt (learn more about New York’s laws). So, you may want to check the taxability of your products in each state you have nexus.
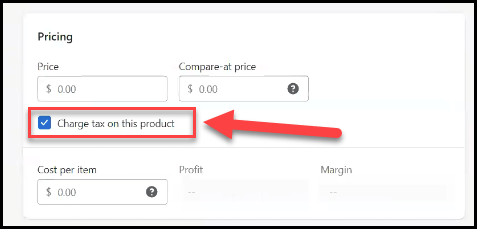
For your taxable products, go to “Products”, then “Add product”. You’ll need to edit each variant of the products you want to collect sales tax for.
When you go to edit each variant, check the box “Charge tax on this product”:
Step 5 – Add Warehouse Locations
Now you need to enter your warehouse locations that are fulfilling orders. Under “Settings,” click on “Locations.” This is really about where you’re shipping your product from.
This step helps Shopify know what rates to charge. For example, if a product is shipped from a warehouse to a customer in the same state as the warehouse, the sales tax rate may differ from if that product was shipped to another state. Shopify needs to know the fulfillment location vs your office location to accurately apply tax rates.
Step 6 – Add Information for Sales Tax Exempt Customers
Finally, you may not be required to collect tax from all your customers. The most common exempt customer you may have is a reseller who buys product through your Shopify store and resells that product. Other tax-exempt entities are government organizations and nonprofits.
These are likely repeat transactions, and you don’t need to collect sales tax from these customers. For these customers, you need to get a tax-exempt certificate from them before not collecting sales tax.
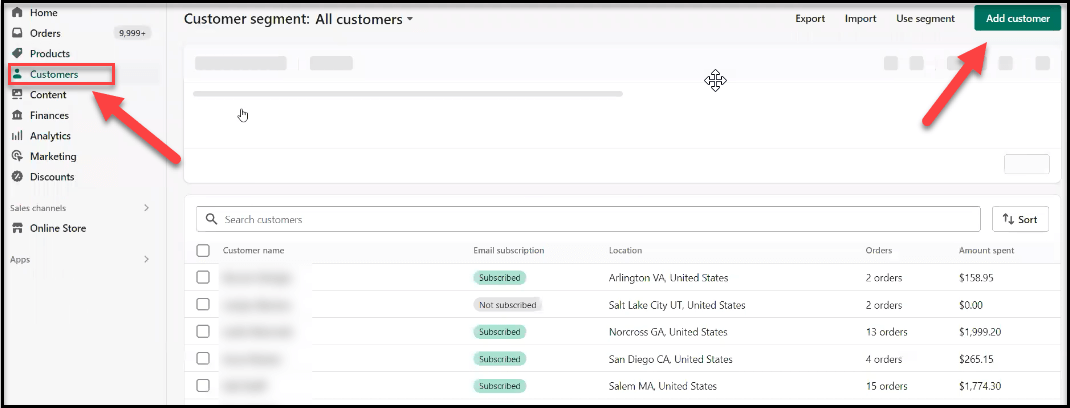
To mark these customers in your Shopify store as tax-exempt. Go to “Customers”, then “Add Customer”:
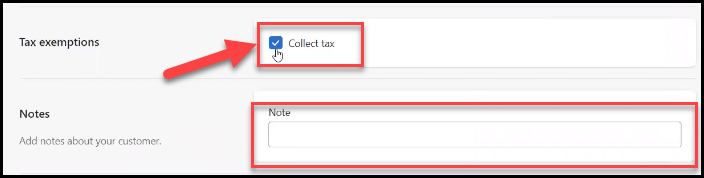
Then make sure the “Collect tax” box is deselected, and you can enter a reason as to why:
How to Get Help
We hope this blog and video contain helpful information to get your sales tax settings configured. Some of the information provided has probably brought up more questions and we’re happy to help you get the answers. If you’re not finding all the answers you need here, you are welcome to schedule a consultation with one of our sales tax experts.
You may also find it helpful to take our sales tax maturity assessment to clearly see where you are and how to get the help you need. If your business is larger than $1M in annual sales, you are reaching a point where you may need help from appropriate tax experts. Please don’t hesitate to reach out to LedgerGurus for help on this subject or other e-commerce accounting needs.
Regardless of whether you’re ready to outsource or not, we encourage you to download our 10 Steps to Ensure Sales Tax Doesn’t Burn Down Your eCommerce Business. It is a complete guide to online sales tax compliance and will help you have much more peace of mind with this issue.
Our final recommendation is that you check out our masterclass The Uncomplicated Truth about Sales Tax. Make note, especially, of the three things you must NOT do when you’re setting up your sales tax. Believe me, you don’t want to miss it!