Creating a cost of goods sold journal entry in QuickBooks Online (QBO) is a simple, effective way to stay on top of your numbers and maintain predictable, sustainable profit margins throughout each quarter. It’s also really important.
The good news here is that this is much easier than you might expect.
We’ll cover several methods you can use, as well as an optional method that can automate most of this process for you!
- 3 Ways to record a cost of goods sold journal entry
- The ‘Bucket to Bucket’ method of tracking COGS in QuickBooks Online
- The steps for recording COGS in a QuickBooks Online journal entry
- The ‘Tracking Item by Item’ method of tracking COGS in QuickBooks Online
- Using an inventory management tool to track COGS
- A2X – The optional extra
- Why is cost of goods sold (COGS) important?
- FAQs
- How LedgerGurus can help
Read on to level up your ecommerce accounting.

Key Takeaways
-
Recording COGS correctly keeps your profits real by matching expenses to sales instead of lumping inventory costs when purchased.
-
The “Bucket to Bucket” method is the simplest way to track COGS in QuickBooks Online if you’re not using an inventory tool.
-
Automating COGS tracking with A2X or an inventory system saves time and errors, giving you cleaner books and more reliable data.
-
Accurate COGS entries drive smarter decisions about pricing, purchasing, and growth because they show your true margins each month.
3 Ways to Record a Cost of Goods Sold Journal Entry
We’ll discuss three main ways to record COGS:
- The ‘Bucket to Bucket’ method
- Tracking item by item
- Using an inventory management tool
We’ll also talk about:
- A2X – An alternative to tracking all this data manually
- Why is Cost of Goods Sold (COGS) Important?
- And answer several FAQs
The ‘Bucket to Bucket’ Method of Tracking COGS in QuickBooks Online
This is the method we recommend if you are not using an inventory tool. It is the simplest and most straightforward.
This process of adding a cost of goods sold journal entry looks like:
- Calculate your Cost of Goods Sold number.
- Use this number to make a journal entry in QBO that moves this lump sum from your balance sheet to your profit and loss sheet.
Confused? Don’t be; it’s actually really simple. This method just needs two data points to work effectively:
- Your inventory figures
- Your COGS number
We’ve created a free template to help you track and manage your inventory and COGS. It has sections for quantity reconciliation, COGS computation, physical inventory valuation, and a product cost catalog.

We’ve also made a video showing you how to use it.
Use these numbers in the method.
Pros for the ‘Bucket to Bucket’ method
- It keeps your QBO file nice and clean, without unnecessary entries or distractions.
- It makes it much easier to validate your data. You’ll be using a spreadsheet and will be able to quickly understand what you’re actually looking at.
Cons for this method
- It requires some experience with spreadsheets. Don’t worry, though; it’s fairly straightforward.
- The quantities of your inventory won’t be tracked automatically.
If you’re wanting to bypass the spreadsheets and go straight to an inventory tool, make sure you read this article first that gives criteria to look for when choosing an inventory management tool.
The Steps for Recording COGS in a QuickBooks Online Journal Entry
Follow these basic steps to make your journal entry.
Step 1 – Create Your Product Costs Catalog
We go into some detail on how to create a product costs catalog in this article, as well as in this video: Create a Product Cost Formula | A Step by Step Guide.
Check out this oversimplified example of a product catalog below:
| Item | Cost | Quantity Sold | Total COGS |
| Black Shirt | $2.40 | 15 | $36.00 |
| Blue Shirt | $3.15 | 8 | $25.20 |
| Red Shirt | $1.80 | 15 | $27.00 |
| Green Pants | $2.57 | 9 | $23.13 |
| Purple Scarf | $4.30 | 30 | $129.00 |
You’ll want to use your spreadsheet software of choice to create a catalog like the one above for your own inventory. Take the data from whichever channels you’re selling on to input how many units you’ve sold over a given time period and how much each unit of inventory sold costs you.
For more information on costing methods for your inventory, read 3 Inventory Costing Methods.
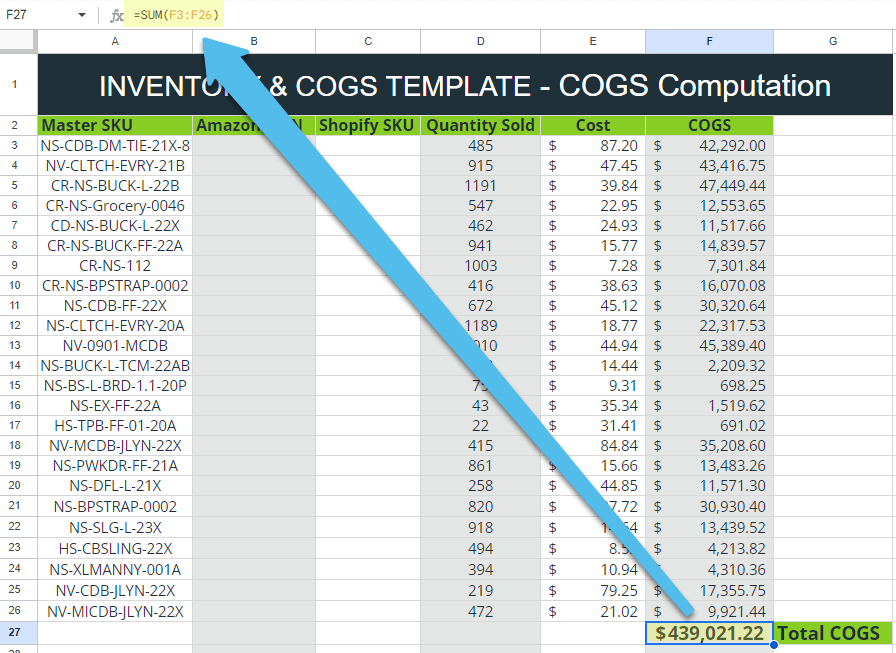
Step Two – Multiply the Cost by SKU X Quantity Sold
To find the right COGS figure for each of your products, multiply the number of units sold by the cost of each unit. With just a tiny bit of “Excel-fu”, this can be set up to calculate automatically.
Follow these steps:
- Type an ‘=’ equals sign in your Total COGS column.
- Click on the correcting Cost cell for the given product.
- Type an ‘*’ asterisk symbol.
- Click the correct Quantity Sold cell for the given product
- Hit Enter.
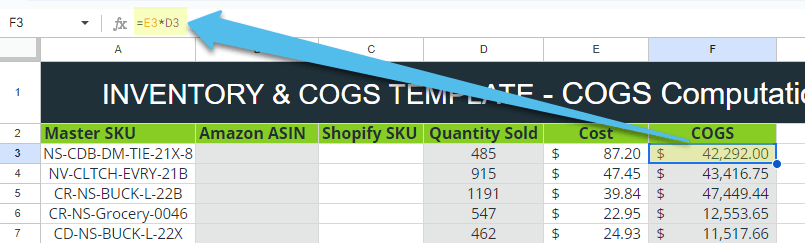
This will tell Excel, ‘Hey, multiply the figure in this cell by the value of the figure in this other cell.’
Next, you can tell Excel to automatically sum up a total for your COGS column. Follow these steps to do this:
- Type an ‘=’ equals sign in the cell directly underneath your COGS column.
- Type SUM.
- Click and drag to select all of your COGS cells.
- Hit Enter.
Step Three – Add a Cost of Goods Journal Entry in QuickBooks Online
To add a new journal entry in QBO, click New and then Journal Entry. You’ll now be using the data you just collected to create your COGS entry.
Take your total COGS amount and:
- Add it as a credit in your Inventory assets.
- Add it as a debit in your Cost of Goods Sold account.
That’s it! You’ve successfully updated your profit and loss statement in a way that makes predictions much more sustainable.
A quick note on the method described above – you’ll also want to do semi-regular – let’s say quarterly – inventory checks and manually adjust any inconsistencies you may find.
The ‘Tracking Item by Item’ Method of Tracking COGS in QuickBooks Online
This method can become very labor intensive, especially as your business grows. But it is helpful to see how it works in case you need it.
This process looks like:
- To add a new journal entry in QBO, click New and then Journal Entry.
- Enter the Journal Entry date.
- Input the Debit entry by selecting the “Cost of Goods Sold (COGS)” account and entering the cost associated with the sold item in the “Debits” column.
- Input the Credit entry by selecting the “Inventory Asset” account and entering the same cost amount in the “Credits” column. This reduces your inventory value on the your Balance Sheet.
- Add a memo to your journal entry to provide context. You can mention details like “COGS for [product name] sold on [date].”
- Verify the entry by ensuring the total debits equal the total credits. The journal entry should balance out to zero.
It’s a good idea to periodically review your financial statements (Profit & Loss and Balance Sheet) to ensure the COGS and Inventory Asset accounts reflect the correct amounts.
Pros for this method:
- This method gives you full control and flexibility to make specific and customized entries, especially if there are some special circumstances that standard inventory methods can’t handle.
Cons for this method:
- It is incredibly time consuming, especially for businesses with a large volume of transactions.
- It is also prone to human error and inconsistencies.
Using an Inventory Management Tool to Track COGS
IMS systems make tracking COGS infinitely easier because each item is uniquely identified (with barcodes, QR codes, etc.) which makes them easy to track through the inventory cycle.
When a sale is made, the system automatically deducts the sold items from inventory and recognizes the associated costs as COGS.
Pros of this method:
- There are lots of pros, but just a few are real-time updates, integration with accounting software, and audit trails showing the history of each item, including purchase prices and sale prices.
Cons of this method:
- There is a learning curve and the cost can be prohibitive for small businesses. There are other potential drawbacks as well, so choosing the right system to align with your business’s size, needs, and growth projections is crucial.
If you’re interested in implementing an inventory management system or discussing how one would work with your business, be sure to let us know. We have an entire team that specializes in IMS implementations and helping businesses pick the right one for their needs.
A2X – The Optional Extra
Even if you’re not ready for an IMS, you can still automate part of this process? We rave about A2X in several of our videos; it makes a whole lot of accounting processes much simpler.
It’s possible to sync your A2X account with your various ecommerce channels. This means A2X will pull in data about your SKUs that are currently being sold. You’ll see figures for the number of units you have in stock and how many have been sold in a given time period. By the way, we have a service where we set A2X up for you and sync it both to your sales channels and QBO, making sure that your chart of accounts is mapped out properly, too.
All you have to do is enter the cost for each SKU manually and then click the Review button. This shows you all the relevant COGS data you’ll need. The blue Resend to QuickBooks button will push this information over to your account.
This lets you skip the spreadsheet-making portion of the method we described above. The only manual part of this process is entering your SKU costs!
Why Is Cost of Goods Sold (COGS) Important?
Knowing how inventory moves through a business financially is crucial to understanding why it is recorded in this way.
Good accounting practices dictate that inventory SHOULD NOT be expensed upon purchase. This is a common mistake that can skew your profit and loss statement wildly up or down in a given month accounting period.
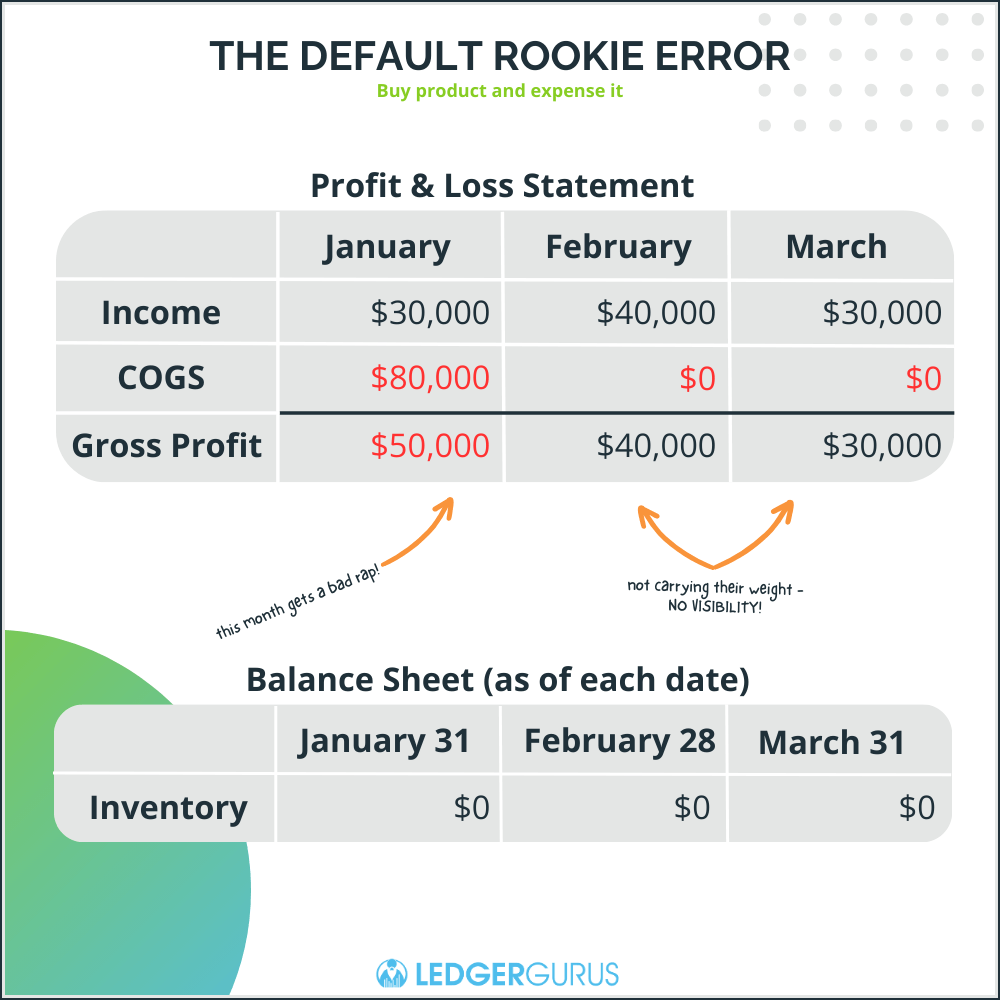
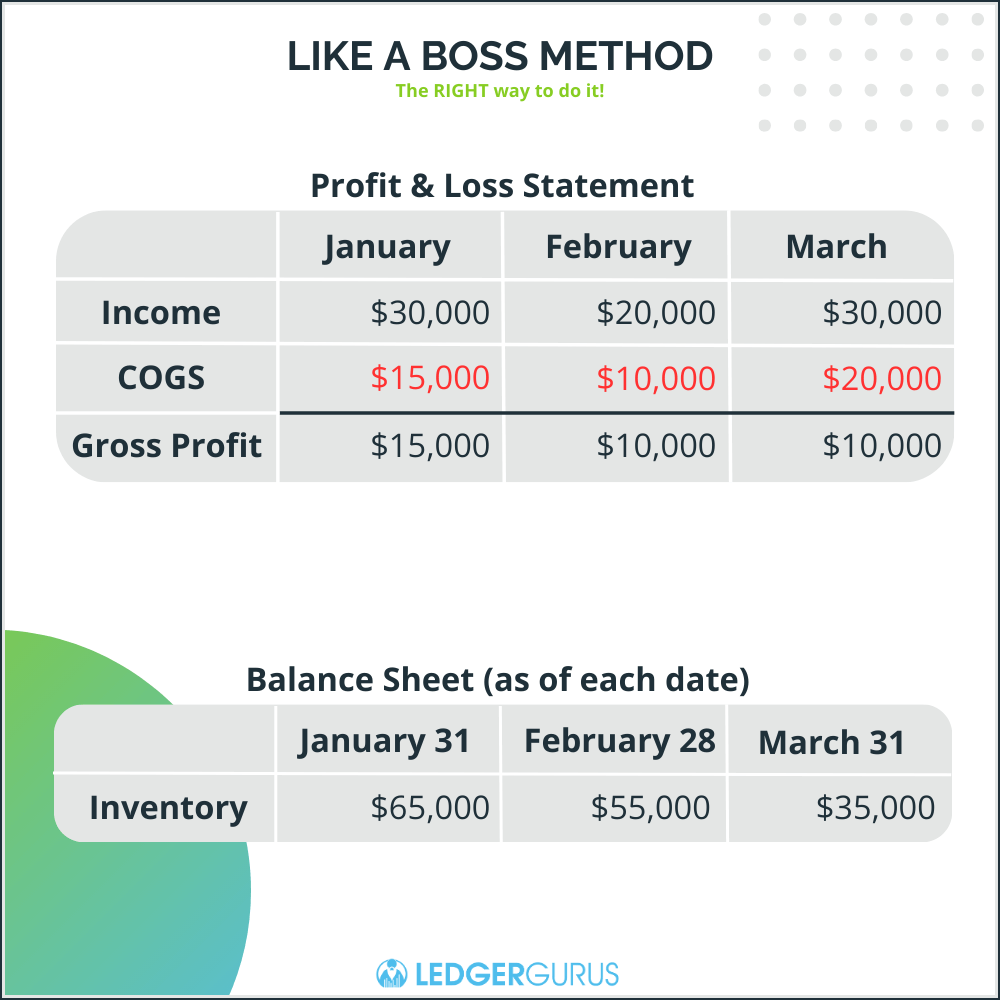
Instead, your goods should be recorded as assets on your balance sheet, and expensed incrementally as and when each unit is sold.
 Instead, your goods should be recorded as assets on your balance sheet, and expensed incrementally as and when each unit is sold.
This is where the term ‘cost of goods sold’ comes from.
Expensing your inventory this way helps keep your profit and loss statement (also called an income statement) far more consistent and easy to use. Instead of seeing wild losses in the month that you buy new inventory and inflated gains during the following months, you’ll see a balanced statement that can be used to sustainably predict each coming quarter.
For more information, read Cash vs. Accrual Accounting for Inventory.
FAQs
Is Cost of Goods Sold a Debit or Credit?
Cost of Goods Sold (COGS) is a debit. When recording a sale of inventory, the COGS account is debited to increase its value, reflecting the expense incurred for the items sold.
Correspondingly, the inventory account is credited to decrease its value, showing the reduction in items due to the sale. This dual entry ensures the accounting equation remains balanced.
What is the difference between operating expenses and COGS?
Cost of Goods Sold (COGS) represents the direct costs associated with producing goods or procuring products that a company sells, including raw materials and direct labor.
Operating expenses, on the other hand, refer to the indirect costs that a business incurs as part of its regular operations, such as salaries of non-production staff, rent, utilities, and marketing expenses.
While both COGS and operating expenses reduce a company’s profits, COGS is tied directly to production or procurement, whereas operating expenses relate to the overall administration and day-to-day functioning of the business.
How Does Inventory Affect COGS?
Inventory directly influences the Cost of Goods Sold (COGS) as COGS represents the cost of inventory items that have been sold during a specific period.
When a business sells products, the value of the sold inventory is moved from the inventory account to COGS. If inventory levels are high, it suggests that fewer goods have been sold, leading to a lower COGS. Conversely, if inventory levels decrease significantly, it indicates more goods have been sold, resulting in a higher COGS.
Thus, the movement in inventory levels is inversely related to the value reflected in COGS.
How LedgerGurus Can Help
Understanding and managing the Cost of Goods Sold (COGS) is crucial for any business aiming for sustainable profit margins. Whether you’re using manual methods or considering the leap into an automated Inventory Management System (IMS), the right approach can transform your ecommerce accounting.
At LedgerGurus, we specialize in both areas: from implementing and optimizing IMS systems to expertly handling inventory accounting without the need for advanced systems. Our team is ready to assist, ensuring your inventory and COGS are on point.
Elevate your inventory management and accounting by exploring LedgerGurus’ comprehensive inventory services today.
 Some Useful Resources and Suggested Reading
You may find the following links helpful here: